Thursday 30 May 2013

Mirage

Hello lovelies!

Today's post is instalment #1 of 4 about a series of custom polishes that Kimberly over at Tryst Lacquers made for me. She's a sweetheart and her polishes are awesome; I strongly recommend you check them out if you haven't already. She only ships to Canada and the States at the moment, but I'm happy to do some nail mail magic if you spot anything you really want!


This is a much paler orange than it's appearing in photos-- the last photo gets it the closest. It's a pale orange with an edge of peach, filled with silver micro holo glitter and opalescent flakes. The flakes come in small to quite large, and the odd one is a pain in the butt, requiring you to wipe them off the brush lest they get all curly on your nail. A good coat of Glitter Food, though, and the bumps are all sorted out. It dries down to a good thickness, even with 3 coats. And, in spite of the flakes, it's a super-easy polish to apply and control. Kimberly makes a good product!


This is a simpler nail art in large part because I felt like something I could hammer out quickly, and because I used 100% nail polish for this look, so I didn't have the workable time of acrylics on my side. I think it came out quite cutely! That little buffalo skull is my favourite part, and the part I thought I'd have the hardest time with.


The opalescent flakes in an orange base strongly reminded me of mirages in the desert, so that's why I named it Mirage! :) I fiddled with the levels and colour balances to try to get the polish colour more accurate in this photo, but it's still a bit too darkly orange. You'll have to use your imaginations! ;)


Polishes used:
Tryst Lacquers - Mirage (custom)
OPI - My Vampire is Buff
Sally Hansen - Mellow Yellow
Nails Inc - Porchester Square
Zoya - Godiva, Tracie
Rescue Beauty Lounge - Recycle
Elevation Polish - Xixabangma, Streetside NYC, Temperance
Duri - Rejuvacote (base coat)
Seche Vite (top coat; only on top of Mirage, not on top of nail art)

The other three custom polishes I have to show you are Confection, Rosin, and Calypso! I gotta brainstorm ideas...

DON'T FORGET ABOUT MY CONTEST / GIVEAWAY!!


J.

Tuesday 28 May 2013

Tattoo-Style Chrysanthemum

I love chrysanthemums. They're so complex looking, like little floral nesting dolls, and they unfurl their long fine petals so delicately. They're like the peony's more restrained sister. :)


I did these up for an IG contest with a theme of 'tattoo style'. (Yes, the same one as my one-stroke roses of wallpapery questionable success!) I haven't been feeling my nail art mojo these past couple days -- a lot of Real Life stuff is weighing on me, I think -- but I was browsing through Google Images and was moved to at least try this out. And while it isn't as elegant as the drawing I based it off of, I think it's still a pretty eye-catching result!


I began with three coats of Flushed, followed by a coat of Wicked Fast. The flower and leaves are all acrylic paint. I loooove Flushed, but am not yet sure about Wicked Fast. It seems to be producing shrinkage on me (and I'm noticing dents in the fingers of my other hand long after Seche would have prevented them from happening). I like its thinner consistency for most purposes, but I find it best to stick with a thicker topcoat when putting it on top of nail art, so as to not disturb the art underneath (which is why I used Seche in this case).

Polishes used:
Cult Nails - Flushed, Wicked Fast (top coat)
Duri - Rejuvacote (base coat)
Seche Vite (top coat)
acrylic paint in green, yellow, red, white, crimson, black
detail brush

So, worth the effort? Or at least better executed, as an idea, than last time?? :P

Don't forget my giveaway! Enter enter enter, it is so lonely without you!!


J.

Monday 27 May 2013

CELEBRATION TIME! Nail Art Contest / Giveaway!

Hellooooo lovelies!

I have reached 1,000 followers on Instagram-- my unending appreciation to each and every one of them (and you, if you are among them)-- and wanted to celebrate! But how?

I thought that, well, nail art is what got me into this delightful, fizzy, exuberant mess, so it made sense to continue the tradition of loving nail art. That said, many IG nail art contests can be frustrating (at best) and demoralizing (at worst). So my solution to this is to have my nail art contest winners be chosen randomly!

Here's what to do:

1) Do up some nail art. It can be anything, so long as it isn't just a plain French manicure. Use your imagination! Glitter? Sure! Striping? Why not! Dotticures? Totally! Fancy-pants florals? Yes! You see where I'm going with this. It can be anything, and your skill level doesn't matter. Just have fun!

2) Post it to your Instagram, if you have one, or your blog, if you have one, or else upload it using a service like Imgur. Just so long as you get a link so that I can see it, because you'll need it!

3) Use the Rafflecopter widget below to submit your information and collect extra entries. The only mandatory ones are your email (so that I can contact you) and the link to your nail art. IG hashtags will not be used for this contest-- only the Rafflecopter widget. Here's the short link for you mobile folks, in case the below isn't showing up properly.


a Rafflecopter giveaway


Some important terms & conditions stuff:

- Contest runs from 27 May 2013 00:00 MDT (= GMT - 7:00) to 15 June 2013 00:00 MDT.

- There will be two winners! First prize and second prize, as above. Both winners will be chosen randomly by Rafflecopter.

- I will contact the winners ASAP; if they don't get back to me within 48 hours, I will use Random.org or whatever other means I have to pull new winner(s). Hopefully this doesn't happen!

- Open internationally! However, any shipping above $10 (for the polishes, obviously) is the winner's responsibility; I will send a PayPal invoice for the amount once I know it.

- Must be age of majority or have parental permission to give me your mailing address (only for the polishes).

- No drama! I love each and every one of you, I promise.


I am so excited to see what you lovelies come up with!


Major hearts,

J.

Sunday 26 May 2013

Deconstructed Patterned Mani

Lately, there has been a resurgence of what is being called "tribal" nail art. It's a beautiful technique, characterised by dividing the nail up into sections with horizontal lines and then filling in the sections with different patterns, often with a gradient background. To my mind, there is nothing 'tribal' about it, and I try to stay away from words like that, anyway.

In light of all that yammering, here is my deconstructed take on the trend.


This did take as long as it looks like it did. I started with a base of two coats of Guy Meets Gal-veston (which is actually a neon pink jelly; so, not the red that appears here!), taped off the lines, and then sponged on two coats of a gradient of Electric, Aciiied, and Green with Envy. I coated that with Seche and then went to town with a fine detail pen to get all the designs. In a way, using a pen is cheating, compared to a detail brush, but I really wanted to use small shapes. Plus, the time, effort, and necessity for a steady hand all remained the same. ;) Another coat of Seche to seal everything and it's done!


Polishes used:
OPI - Guy Meets Gal-veston
Revlon - Electric
Models Own - Aciiied
Sally Hansen - Green with Envy
Duri - Rejuvacote (base coat)
Seche Vite (top coat)
striping tape
fine-point tweezers
Pigma MICRON .005 pen
makeup sponges
microscope eyes

I think I'll leave these be for a day or two before I move on to the next thing. (My left hand currently has only the lines and gradient, gotta work on that one slowly!)


J.

Friday 24 May 2013

Gradient Gingham

I COULDN'T STAY AWAY

The first step to fixing a problem is admitting you have a problem. I probably have a problem, but I definitely don't care.

Now... what to call these? I don't know what these are. Reverse plaid? Regular plaid? Gingham? None of the above? Whatever, I'm going with gingham because then I've got an alliterative title.


It's a super gross, rainy day here today (which is good, it's the first good rain of the season, I can pretty well hear the plants heaving a sigh of relief). As such, I wanted something colourful! And then I couldn't leave a gradient well enough alone.


Turns out I can't use a liner brush worth a damn. Look at that middle finger! For one, it's missing a line (!!!), and for two, it's on a slant! Holy jeez.


For this look, my gradient was made with the Sally Hansen colours over a base of French White to make them pop. I did the lines with Funny Bunny and the KONAD polish. It's a pretty straightforward look!


Polishes used:
Nina Ultra Pro - French White
Sally Hansen Xtreme Wear - Fuchsia Power, Coral Reef, Sun Kissed, Green With Envy
OPI - Funny Bunny
KONAD - Special Stamping Polish in White
Duri - Rejuvacote (base coat)
Poshé (top coat)
two sizes of liner brushes
a questionably steady hand

I will still give it a few days between manis for the time being, while my cuticles continue to heal-- they are still nowhere near where I'd like 'em!


J.

Monday 20 May 2013

Studs and Spots

Hello lovelies,

I sat down to do a complex architectural mani for a contest, and found out that I had zero energy for it. Nada. So I decided to play with texture instead.


Water spotting looks cool when it works, but it is even more finicky than water marbling. Here's why: TWO variables (polish and spray) instead of one (polish). You could find a polish that works well for spotting, but your hairspray (e.g.) doesn't work at all, or some permutation of the above. Nutso. These two polishes also spotted into a completely different way, which I thought was neat!


Nonetheless, this mani (after much trial and error) didn't turn out badly. I think it looks pretty cool. The base is 1972, which is a much pinker lavender in real life, but everything going on made my camera unhappy. :) It was glorious to apply, as all la couleur couture polishes are; I also think they have my single favourite brush of all time.


Polishes used:
Essie - Penny Talk
Nina Ultra Pro - French White
hairspray
tape (to cover fingers)
1.5mm silver studs
Duri - Rejuvacote (base coat)
Seche Vite (top coat)

As I mentioned yesterday, I'll be taking the week off to try to get my hands/nails/cuticles back to a healthy state, because they are incredibly unhappy right now. I will play it by ear as I go. I'm also finding that I've run out of steam when it comes to nail art, so I think taking a short break will do me good. Absence, fonder heart, blah blah blah!

See you soon! ;)


J.

Sunday 19 May 2013

SIMPLE(R) SUNDAY: Glitter Lines

Hello lovelies,

I'm not sure what to make of this one. On the one hand, the basic principle isn't difficult (though mastering the method is). On the other hand, it takes forever. So, if you are an impatient person like I am, this look is very difficult.

Sorry I look jaundiced; I was trying to get the polishes colour-accurate.

I started with a base of 1977, with Honey Dew on my accent finger. I then coated my thumbnail with a non-quick-dry Duri top coat I had kicking around, licked the tip of a toothpick, and began to place the little holo diamond glitters.


I repainted top coat as needed to make sure the glitter would stay put. I had a pair of cuticle nippers handy in case any pieces of glitter went awry, which of course they did, in order to gingerly pick them up off of wherever on my nail they decided to alight. Oh, and cursed. I cursed a lot.


For the queen bee of glitter placement, I invite you to check out Polish All the Nails. I think Laura might be a superhero. A glitter superhero. She also has very handy tutorials on how to do stuff like this. Hint: start in the middle!!

The sunshine didn't want to play with the holo; boo!

Polishes used:
la couleur couture - 1977
piCture pOlish - Honey Dew
Duri - Rejuvacote (base coat)
Duri - non yellowing top coat
Seche Vite (2 coats)
toothpick
loose holographic diamond glitter
patience
loss of patience
loss of mind

I'm thinking of doing one more manicure tomorrow for a competition on Instagram, then it's a solid 5 days of naked nails for me-- gotta let them breathe, and try to get my cuticles in line again.


J.

Saturday 18 May 2013

SWATCH SATURDAY: Forget You

Many moons ago, Deborah Lippmann came out with a glitter topper called Happy Birthday, and it went on to become a nail blogger darling (well, at least the original version; but I think the new version to be prettier). To me, though, while it was nice, it was missing something. It turns out that something was a black jelly base.


Suh-WOON. A rainbow jelly sandwich in a bottle! When I was in high school, I went through a phase of being what I could only describe as a 'glitter goth'. This appeals to exactly that part of me.


For this, I used two coats of Glitter A-Peel, three coats of Forget You, one coat of Glitter Food, and one coat of Seche. In spite of the coats, it isn't very thick. That's because Forget You, in spite of being very glitter-dense (no dabbing needed for this polish!), is suspended in a miraculously smooth, relatively thin jelly base. It was a real pleasure to work with, almost no clean-up required.


Look at all those layers! I love the glitters peeking through the black jelly. SO MUCH.

Polishes used:
Deborah Lippmann - Forget You
Nail Pattern Boldness - Glitter A-Peel (base coat), Glitter Food
Seche Vite (top coat)

Still trying to decide what to do for Simple(r) Sunday tomorrow! AAAaaaahh.


J.

Starfishies!

I was in the pharmacy the other day and this blue polish, Blue My Mind (haha), called out to me. So, today, I used it for some quick 'n' dirty nail art: starfish!


For this look, I went with two coats of smooth, buttery blue polish-- such an awesome colour in person, a bright shimmery primary blue, it's like Wonder Woman blue. I then painted the starfish with acrylic paint.


All of the designs are based on real starfish! I think starfish are so neat. I love how they move, how they hang out on things at low tide, how they're these little mechanical masterpieces when they're prying things apart... pure awesome. Plus they're cute.


Polishes used:
Sally Hansen - Blue My Mind (Salon Effects line)
Duri - Rejuvacote (base coat; do not skip base coat with blue polish, though this one doesn't seem to stain!)
Seche Vite (top coat)
acrylic paint
detail brush


J.

Wednesday 15 May 2013

Grain Elevator

This was a lot of fun to do, improbable-looking clouds included. (Colour theory? What's that?)


Unfortunately, it was awful to photograph, so you only get one snap. And, for the first time ever, I've blurred my cuticles. It's for your protection. They're up to some kind of mutiny and I'm not clear on why. I think next week will be a Nakey Nails week while I try desperately to cajole my fingers back to presentability.

This will be entered in a couple of contests, and for some reason I was feeling more Prairies than usual, hence the canola and grain elevator and what have you.

All acrylics, sealed with Seche!

Polishes used:
Duri - Rejuvacote (base coat)
Seche Vite (top coat)
acrylic paints (all of the colours!)
size 2 and size 0 square brushes
teeny detail brush


J.

Tuesday 14 May 2013

One-stroke Roses

Hey, guess what! One-stroke is harder than water marbling. By several orders of magnitude. I used up a whole nail wheel only to end up with a mediocre result anyway. Those who can do one-stroke well are MADE OF MAGIC.


@seizethenail is having a contest based on 'tattoo style', and I've always found that one-stroke roses look like tattoo roses. Of course, I ended up with wild roses, not red roses. And I can't one-stroke to save my life. And this looks like wallpaper. SO IT GOES.


These are all acrylics on a base of Black Expressionism. (What a weird-ass name for a polish.)


Polishes used:
Finger Paints - Black Expressionism
Nail Pattern Boldness - Glitter A-Peel (base coat)
Seche Vite - top coat
acrylic paints
one-stroke brush
detail brush


J.

Pretty Serious Turns 1! And so does Daphne!

Today, 14 May 2013, marks something momentous: the first anniversary of Pretty Serious Cosmetics. Excellent work, Kaz and the gang! To many more fruitful years! Χρόνια πολλά!

It's also therefore little Daphne's first birthday. To mark the occasion, Pretty Serious released a special edition glitter topper called Daphne's Birthday Party. It's a very fun mix of small glitters in various colours. To me, it reads more Mardi Gras than Christmas, and that's a good thing!


For this look, I did a gradient over Calm & Clear (I painted Calm & Clear over the first coat of glitter for a jelly sandwich effect), then painted on Daphne's name with Hallelujah. I finished it off with a little blue holo heart (not that the holo shows in the lightbox).


Polishes used:
Pretty Serious Cosmetics - Daphne's Birthday Party
Spa Ritual - Calm & Clear
Contrary Polish - Hallelujah
Layla - Ocean Rush (holographic)
PVA glue for base coat
Seche Vite - top coat
detail brush

I promised you a contest entry for yesterday, and I did indeed get it done, but I haven't taken photos yet! It'll go up this afternoon for sure. :)


J.

Sunday 12 May 2013

SIMPLE(R) SUNDAY: Paisley Print

This is technically Monday! But I'm still awake, so it's still Sunday as far as I'm concerned.


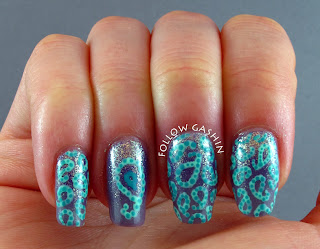
For this look, I began with a base of Play Me, sponged some Lil Miss Sunshine on the upper halves, and then did the paisleys using a small dotting tool, Honey Dew, and 1977. They are pretty messy little paisleys, I must say. But I wanted to keep it relatively quick in honour of Simple(r) Sunday.

Cleaning up Lil Miss Sunshine was unbearable, because it's a glass fleck/foil finish. So I apologize for the subpar clean-up job!!


This photo is all wonky in terms of skin tone, but it shows the shimmer in Play Me (and Lil Miss Sunshine) much more accurately than the two photos above. I recommend clicking it to zoom in:


I'm thinking that I'm going to tackle a contest entry tomorrow, so hopefully it'll turn out in reality as it is in my head! :)

Polishes used:
Duri - Rejuvacote (base coat)
Seche Vite (top coat)
small dotting tool
wedge sponge


J.

Saturday 11 May 2013

SWATCH SATURDAY: Inner Beauty is for Amateurs

Today I have the polish that has given my camera the hardest time of any I've photographed so far. I'm going to have to ask you to use your imaginations to patch the photos together to get something of an idea!


This lovely polish is Inner Beauty is for Amateurs by Nail Pattern Boldness. It's a lot brighter than above; I had to tweak the levels to get the micro glitter and iridescent glitter to show up. A gorgeous bright classic blue-toned red jelly, highly pigmented (I used two coats). Goes on like a dream-- very easy to control where the polish is going, and dries rather quickly, too!

The following two shots are my attempt at showing you the glitter. The outdoor one (left) is purposely blurred and gets the red's brightness down perfectly, but is a little too orange. The right one is just a bottle shot near the window because I found this showed the iridescent glitter the best. All of the glitter is very noticeable on the nail. It's a polish best appreciated in person. :)


I don't think that it'd be hard to remove, in spite of its glitter density, because of how small the particles are. But I wouldn't know, because I used NPB's new Glitter A-Peel base coat!!! I am so excited about this product, it's wonderful. I used a birch stick and it peeled well for me, even though I took this off only about an hour after application (onto nail art!). I find that PVA glue requires you to have your mani on for at least a half-day, preferably a full day, before it can be peeled without becoming a sticky, stuck, sticking bloody mess. So, major kudos to Nail Pattern Boldness for knocking this one out of the park.


Polishes used:
Nail Pattern Boldness - Glitter A-Peel, Inner Beauty is for Amateurs (the link provides excellent swatches, much better than mine!)
Seche Vite (top coat)
random iridescent stars I found... somewhere?


J.

Friday 10 May 2013

Candied French

Hello! I thought this one would be easy to knock out both hands in a couple hours, la di da.


FALSE.


This look was inspired by the delightful confectionary nail art of @glitterfingers. Her linework style is so unique, and I love it, and I have obviously not come anywhere near it. But this is still kind of a homage to her work. (I have covered up my free edges in designs because they are irredeemably stained.)

The gummy bear is my favourite.


This began with a coat of ridge filling base coat, followed by a coat of Nail Glow. I then painted everything in acrylics and sealed it all with Seche Vite.


Polishes used:
Essie - Ridge Filling (base coat)
Dior - Nail Glow
acrylic paints in pretty much every colour
detail brush and überdetail brush
Seche Vite (top coat)

What do you think of this one? Worth the effort??


J.
 
SITE DESIGN BY DESIGNER BLOGS