Showing posts with label argh. Show all posts

Monday, 20 May 2013

Studs and Spots

Hello lovelies,

I sat down to do a complex architectural mani for a contest, and found out that I had zero energy for it. Nada. So I decided to play with texture instead.


Water spotting looks cool when it works, but it is even more finicky than water marbling. Here's why: TWO variables (polish and spray) instead of one (polish). You could find a polish that works well for spotting, but your hairspray (e.g.) doesn't work at all, or some permutation of the above. Nutso. These two polishes also spotted into a completely different way, which I thought was neat!


Nonetheless, this mani (after much trial and error) didn't turn out badly. I think it looks pretty cool. The base is 1972, which is a much pinker lavender in real life, but everything going on made my camera unhappy. :) It was glorious to apply, as all la couleur couture polishes are; I also think they have my single favourite brush of all time.


Polishes used:
Essie - Penny Talk
Nina Ultra Pro - French White
hairspray
tape (to cover fingers)
1.5mm silver studs
Duri - Rejuvacote (base coat)
Seche Vite (top coat)

As I mentioned yesterday, I'll be taking the week off to try to get my hands/nails/cuticles back to a healthy state, because they are incredibly unhappy right now. I will play it by ear as I go. I'm also finding that I've run out of steam when it comes to nail art, so I think taking a short break will do me good. Absence, fonder heart, blah blah blah!

See you soon! ;)


J.

Sunday, 19 May 2013

SIMPLE(R) SUNDAY: Glitter Lines

Hello lovelies,

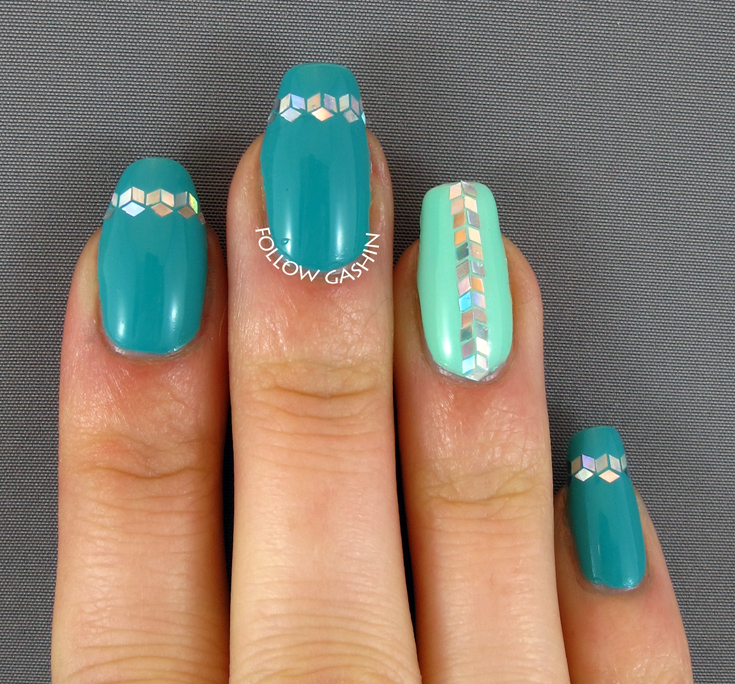
I'm not sure what to make of this one. On the one hand, the basic principle isn't difficult (though mastering the method is). On the other hand, it takes forever. So, if you are an impatient person like I am, this look is very difficult.

Sorry I look jaundiced; I was trying to get the polishes colour-accurate.

I started with a base of 1977, with Honey Dew on my accent finger. I then coated my thumbnail with a non-quick-dry Duri top coat I had kicking around, licked the tip of a toothpick, and began to place the little holo diamond glitters.


I repainted top coat as needed to make sure the glitter would stay put. I had a pair of cuticle nippers handy in case any pieces of glitter went awry, which of course they did, in order to gingerly pick them up off of wherever on my nail they decided to alight. Oh, and cursed. I cursed a lot.


For the queen bee of glitter placement, I invite you to check out Polish All the Nails. I think Laura might be a superhero. A glitter superhero. She also has very handy tutorials on how to do stuff like this. Hint: start in the middle!!

The sunshine didn't want to play with the holo; boo!

Polishes used:
la couleur couture - 1977
piCture pOlish - Honey Dew
Duri - Rejuvacote (base coat)
Duri - non yellowing top coat
Seche Vite (2 coats)
toothpick
loose holographic diamond glitter
patience
loss of patience
loss of mind

I'm thinking of doing one more manicure tomorrow for a competition on Instagram, then it's a solid 5 days of naked nails for me-- gotta let them breathe, and try to get my cuticles in line again.


J.

Thursday, 25 April 2013

Beachy Watermarble (Learning Curve Ahoy!)

Hello lovelies!

Today I tried my hand at watermarbling. I did exactly four fingers and then threw in the towel. People who can watermarble with ease are astounding and awe-inspiring and I am definitely not among them. I'd prefer to paint little Yodas and go cross-eyed. Doing this made me want to build a time machine just so I could go a couple of hours into the past and tell myself not to do this.


For this, I used a combination of Godiva and an acrylic wash of Van Dyke brown to get sort of a sparkly wet sand look. I then covered up all that work with my ineffectual watermarbling.

So it goes! This technique takes a lot of practice (the YouTube gurus make it look so eeeaaasssyyy ;___;) so I'm trying not to lose hope altogether.


And a detail shot to show you the abysmal little bubbles I had everywhere, the terrible clean-up job I did, and the delightful sparkly sand!


Polishes used:
Zoya - Godiva
Sally Hansen Xtreme Wear - White On, Pacific Blue, Mellow Yellow
INM - Out the Door (= the clear stripes)
Dior - Gel Coat (top coat)
acrylic paint in Van Dyke brown + wash brush (#4)
usual watermarbling accoutrements

Going for something simpler for my next look, and I have a Swatch Saturday for you tomorrow (and it's GORGEOUS, you'll see)!


J.

Wednesday, 24 April 2013

Sideways Rainbow Braid Nails

This was going to be SO GOOD. Like most things I've tried lately, it didn't quite work out that way. It's not a total disaster, it just isn't the awesomesauce I was expecting.


I've been seeing a lot of braid nails around, so I thought I'd give it a shot, but sideways, and rainbow. All things are usually better when rainbow. A lot of the colour variations aren't showing up in the photos (especially the pinky; those are 3 very distinct colours of purple, not that anybody would ever know!). This was terrible to clean up, so please don't examine my cuticles-- they're a war zone. :P


And then I bumped my ring finger and pinky while making dinner. Sadpanda.


Polishes used:
Layla - Softouch Effect 08
Inglot - 724
Sally Hansen Insta-Dri - Pronto Purple, Cinna-Snap
Essie - Action
American Apparel - Lopez Canyon, Sunshine State, Crescent Heights
OPI - My Paprika is Hotter than Yours
Zoya - Shawn, Sylar, Mira
Revlon Top Speed - Electric
Duri - Rejuvacote (base coat)
Sally Hansen Insta-Dri (top coat)
Dior Gel Coat (top coat)

Until my next outrageous and unfulfilled adventure, my darlings!


J.

Tuesday, 5 March 2013

FOIL MANI OF DOOM: What Happens When You Use Craft Supplies For Nail Art

Were I Taylor Swift, I'd be furiously scribbling away right now. This manicure and I are never, ever, EVER EVER getting back together. It's awful and I hate it.

I also took these photos outside in -10˚ weather, because I love you, you know.

I'm trying something with these subtler watermarks. I initially thought huge, tacky watermarks would deter stealing, but then came to the conclusion that nobody is likely jonesing to steal these, so I may as well play it classy.

Oh, foil mani, I so wanted to love you.

I found this awesome variegated foil at the neighbourhood art store and thought to myself, "Hey, Ciaté has some fancy set out with stuff like this, I bet this works just as well!" If it does in fact work just as well as this, I'm not clear on why anybody would ever buy/use it.

This is as close to a macro as I'm willing to go, and it makes me cringe.

I started with a coat of Poshé base coat (I tried nail glue over base coat first and it was a hot mess), then waited for it to be semi-dry and swiftly pressed a little square of foil into my nail, smoothing it as best I could with a couple of fingers, trying to get into the corners, etc. Didn't work. Jagged edges, breaks, holes, the whole shabang. Once I got it to a state that was at least half-decent, I gave it a light coat of CND Super Shiney top coat to seal it. Then, once dry, to cover up the awful edges, I did a box frame with black polish (should have used acrylics, my GOSH Nero is in full thickening rebellion) and my one-stroke brush. Because of the crinkly texture of the foil, it was impossible to get a smooth line, so you ain't getting a true macro of this one, sorry bub.


All in all, this took forever, I only did one hand, and I spent most of my time going cross-eyed. I think it looks pretty neat for what it is, but will leave this to more talented folks than I.

I like that my watermark is basically invisible. I think that's called defeating the purpose.

Polishes/supplies used:
Poshé quick-dry top coat
Speedball Simple Leaf metal foil in Variegated
CND Super Shiney top coat
GOSH Nero
One-stroke brush (squared-off)
Buttload of patience

Think I'm going to go for something simple next, and will be ambitious again nearing the end of the week...

J.
 
SITE DESIGN BY DESIGNER BLOGS