Tuesday 30 April 2013

Turquoise Water Marble

Today I decided to throw in the gauntlet and try my hand at water marbling again. I'm pretty happy with how these turned out! I may even one day do a marble that isn't the floral motif!!


For this, I started out with five different colours, but only two were water marbling properly. In real life, 1977 reads a bit more green, and is therefore a true turquoise. la couleur couture colours are amazing at water marbling. They have a thinner consistency that spreads out on the water beautifully.

I broke my thumbnail! My thumb is truncated!! ;___;


Polishes used:
la couleur couture - 1977
Sally Hansen Xtreme Wear - Grey Zone
Revlon - Spirit (dots)
Duri - Rejuvacote (base coat)
Sally Hansen - Insta-Dri (top coat)

I think I'm going to work in 3D florals next! Wish me luck~


J.

Sunday 28 April 2013

SIMPLE(R) SUNDAY: Batfight!

Today's nails were inspired by a few things: first, @glynnavyre on Instagram wanted to see explosion nails; second, I'm headed down to Calgary today for the Fan Expo; third, my friend Jen insisted, upon the occasion of our last hanging out, that we watch the scene in the good ol' Adam West Batman movie wherein he is struggling somewhat underwhelmingly with an inflatable shark affixed to his leg.


It was a good scene.

ZZONK is a real thing; I saw a screencap of it!!

To do this look, I used the explosion mani technique (YouTube it, it's all over the place) and simply added words in a combination of white acrylic paint and nail polish.

This is my favourite one.

Polishes used:
Layla - Velvet Effect 08
OPI - My Boyfriend Scales Walls, Jade is the New Black
Revlon - Electric
Zoya - Tallulah
GOSH - Nero
Duri - Rejuvacote (base coat)
Dior - Gel Coat (top coat-- AND LOOK AT THE SHRINKAGE, SWEET RHUBARB PIE)

All the delightful geekery in the world to you!


J.

Saturday 27 April 2013

Swatch Saturday: Bathed in Light

Oh, holy moly. This polish. Just look at it. This is the polish you wear to work and then people gape when you go outside in the afternoon. This is Bathed in Light, by Dandy Nails.


The above is the multi-chromatic goodness as it appears indoors. I loooove the pink with greenish edges. The base colour is actually a greyed-out blue, which shows up at acute angles (you'll see).

In direct light, the pink goes all flaming on us, and the holo glitter comes to life:


Here is that blue-grey I was telling you about:


The full shift:


Lastly, a blurry photo to show the holo glitter at work:


Polishes used:
Duri - Rejuvacote (base coat)
INM - Out the Door (top coat)

Delicious, right?!


J.

Thursday 25 April 2013

Beachy Watermarble (Learning Curve Ahoy!)

Hello lovelies!

Today I tried my hand at watermarbling. I did exactly four fingers and then threw in the towel. People who can watermarble with ease are astounding and awe-inspiring and I am definitely not among them. I'd prefer to paint little Yodas and go cross-eyed. Doing this made me want to build a time machine just so I could go a couple of hours into the past and tell myself not to do this.


For this, I used a combination of Godiva and an acrylic wash of Van Dyke brown to get sort of a sparkly wet sand look. I then covered up all that work with my ineffectual watermarbling.

So it goes! This technique takes a lot of practice (the YouTube gurus make it look so eeeaaasssyyy ;___;) so I'm trying not to lose hope altogether.


And a detail shot to show you the abysmal little bubbles I had everywhere, the terrible clean-up job I did, and the delightful sparkly sand!


Polishes used:
Zoya - Godiva
Sally Hansen Xtreme Wear - White On, Pacific Blue, Mellow Yellow
INM - Out the Door (= the clear stripes)
Dior - Gel Coat (top coat)
acrylic paint in Van Dyke brown + wash brush (#4)
usual watermarbling accoutrements

Going for something simpler for my next look, and I have a Swatch Saturday for you tomorrow (and it's GORGEOUS, you'll see)!


J.

Wednesday 24 April 2013

Sideways Rainbow Braid Nails

This was going to be SO GOOD. Like most things I've tried lately, it didn't quite work out that way. It's not a total disaster, it just isn't the awesomesauce I was expecting.


I've been seeing a lot of braid nails around, so I thought I'd give it a shot, but sideways, and rainbow. All things are usually better when rainbow. A lot of the colour variations aren't showing up in the photos (especially the pinky; those are 3 very distinct colours of purple, not that anybody would ever know!). This was terrible to clean up, so please don't examine my cuticles-- they're a war zone. :P


And then I bumped my ring finger and pinky while making dinner. Sadpanda.


Polishes used:
Layla - Softouch Effect 08
Inglot - 724
Sally Hansen Insta-Dri - Pronto Purple, Cinna-Snap
Essie - Action
American Apparel - Lopez Canyon, Sunshine State, Crescent Heights
OPI - My Paprika is Hotter than Yours
Zoya - Shawn, Sylar, Mira
Revlon Top Speed - Electric
Duri - Rejuvacote (base coat)
Sally Hansen Insta-Dri (top coat)
Dior Gel Coat (top coat)

Until my next outrageous and unfulfilled adventure, my darlings!


J.

Monday 22 April 2013

Earth Day 2013

Hello!

It is still Earth Day (where I am) (just barely)!

I whipped these up as quickly as possible, which shows, BUT I wanted to do something because the Earth is important to me. As it should be to everybody. (I am talking to you, corporate "persons".)

This is not to scale even remotely, and it is scientifically as off the mark as it is possible to be. You've been warned.

aaaaawkwaaaard

This look is all nail polish except for the Earth, its atmosphere, and the ISS. Because that is indeed the ISS! With a heart! Cmd Hadfield takes some gorgeous photos of this planet, and his love for it is apparent, and my Canadian self is very fond of him and his every-uncle-ness. And so there you have it.

middle finger is KIND OF the milky way-- kind of

Polishes used:
GOSH - Nero
OPI - Happy Anniversary!
Revlon - Spirit
acrylic paints
one-stroke brush and detail brush
Nail Pattern Boldness - Glitter Food (on acrylics only)
Sally Hansen - Insta-Dri (top coat)

Insert Captain Planet theme song here!


J.

Sunday 21 April 2013

Golden Poppies

Hello lovelies. :)

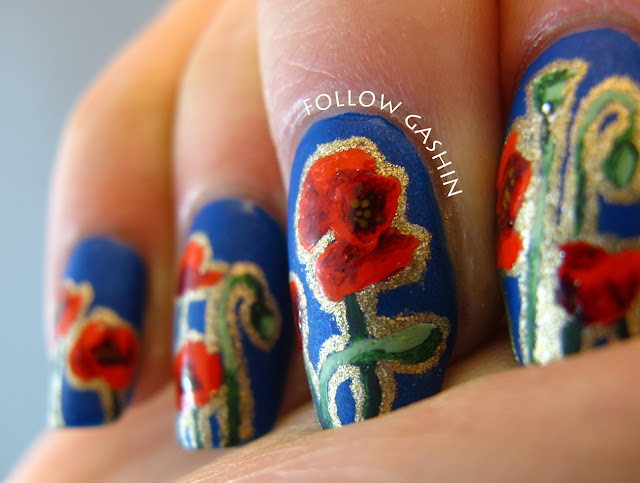
I've been cogitatin' about a tattoo design for a very dear friend of mine and she loves Mucha's poppies, understandably so, which put me in mind of poppies in general. The unbelievably talented Nail Artist (IG: @riddhisn) is having a Floral/Brand/Sport contest, so I thought I'd enter these, even though they didn't come out even remotely as wonderfully as they exist in my head. As usual.


For this, I began with a base of Tallulah (for opacity-- one coat wonder!) and Order of the Garter (for the shade of blue I wanted). I then did the poppies in acrylics, and outlined it all in Filthy Rich very painstakingly with a nail art fountain pen. I then gave it glitter food and a coat of matte top coat. To make the poppies stand out a bit more, I went over them with shiny topcoat. (This effect is more noticeable in person.)


Polishes used:
Zoya - Tallulah
A England - Order of the Garter
Quo by Orly - Filthy Rich
acrylic paints in a variety of colours
one-stroke brush, detail brush, nail art fountain pen
Nail Pattern Boldness - Glitter Food
Essie - Matte About You
Poshé topcoat (only on the poppies)

Here's hoping you guys like these more than I do! I'm allowed two entries to the contest, so you'll probably have another floral coming your way in the next couple of weeks.


J.

Saturday 20 April 2013

Aztec Calendar Nails

These nails drove me MAD. I'm apparently far more patient with painterly nail art than linework. These didn't turn out as nicely as I'd have hoped, but I'm at my wits' end with them.

Topcoat made the black crackle-- unsure what's up with that?

Aztec nails were requested of me on Instagram, and I didn't know quite what to do make of the idea. A Google Image search indicated that most people interpret "Aztec nails" as "tribal nails" (both terms really put me on edge, I'm sensitive to cultural appropriation stuff). I thought it might be best to pay as sincere a homage as I could to an awe-inspiring piece of culture: the Aztec calendar.


So, for this, I started with two coats of Ridnitsohkka and one coat of Atomic. I then painted on the designs with black and white nail art ink and a tiny brush. I used designs from the calendar as faithfully as I could, with some adjustments for nail shape and/or my incompetence (i.e. details too small).


Polishes used:
black & white nail art ink
detail brush
Rejuvacote (base coat)
Poshé (top coat)

I think I'll go back to painterly next! I'm thinking scenery of some sort...


J.

Swatch Saturday: Skittle Manicure of Colour-Shifting Wonder

That has to be the worst title of all time. These polishes, though, are amazing.


For this mani, I painted my thumb, index, and pinkie in Anna Maria. I then painted my middle and ring fingers in Merope. Lastly, I did two coats of Shift Happens on my index and middle fingers. Merope just naturally looks blue and pink-purple simultaneously; it is the most genuinely duo-chromatic polish I own and have ever come across. Anna Maria is deep beautiful shimmery teal and it applies like a dream. Shift Happens is a Clarins 230 dupe and shifts from green to red (and you can see both at the same time on occasion, particularly if you layer it over green, blue, or purple).


Sorry for tip wear; took these photos after 2 days! SO MUCH LOVE

Words cannot express how much I liked this look. It's so striking in spite of being so simple.

Polishes used:
Contrary Polish - Anna Maria
CrowsToes - Merope
Girly Bits - Shift Happens
Duri - Rejuvacote (base coat)
INM - Out the Door (top coat)

These swatches are a nice break from intense nail art. :) This was a good idea, it lets me show off some of the beauties in my collection without cluttering them up!


J.

Thursday 18 April 2013

AT-AT Walker

Hello lovelies!

Continuing with the theme of nail art requested on Instagram, here is an AT-AT, doin' its thang on Hoth. Technically there is a coat of nail polish underneath everything, but you can't see it. Everything you see is acrylic paint.


I decided not to topcoat the AT-AT as I felt that made it stand out from its surroundings more.

And a sunlight shot! Glossy topcoat is glossy.

Materials include:
acrylic paint in white, black, ultramarine, Van Dyke brown, Indian Yellow hue
small flat square brush for background
detail brush for AT-AT
INM - Out the Door (topcoat over background only)

It felt good to get back into detailed nail art like this! Doing the clouds made me want to do some Prairie sunset nail art, which I will hopefully get to soon.


J.

Wednesday 17 April 2013

Spun Sugar Gradient

I'm sorry this didn't go up yesterday! I finished these quite late at night and didn't have it in me to edit photos and write up a post. But I am doing so right now (hiyah).


For these, I started with a base of Still Waters-- it's a lovely colour deserving on its own post, and its incredible glowiness is a big part of why the jellies light up in the sunlight as above. It also applied like a dream in 2 coats; because the shimmer is almost (but not!) frosty in its intensity, you need to work your brushstrokes a bit to get them evened out, and Still Waters is probably the most indulgent polish I've worked with in months. It has an almost marshmallow squishiness to it and it stays smooth as butter for as long as you need it to. Superb.

I then dusted the tops of my nails in the turquoise glitter. Once done, I did the spun sugar technique with the three jellies, going from light green at the tips to dark green in the middle to dark teal up top. I left space for the glitter to shine through. I then topcoated it all to make it last until I could take photos today, but I won't do that next time. It takes away from the spun-sugariness.

Getting the colour balance proper on these was nigh impossible. Sorry for kinda leprotic hand colouring.


Purposefully blurry to show the glitter shininess.

Polishes used:
Liquid Sky Lacquers - Still Waters
Nfu Oh - JS34, JS35
Zoya - Frida
Duri - Rejuvacote (base coat)
INM - Out the Door (top coat)
Martha Stewart micro iridescent glitter in Wintermint

I think I'll do a painting next! I have some ideas, but it seems all my pre-planning goes off the rails lately...


J.

Monday 15 April 2013

Hand-stitched Quilted Nails

Hello friends!

As promised, I've tried to bring you something more entertaining today. A total sweetheart named Shivani over on Instagram wanted to see quilted nails, so that's what I've done!

Sorry for dry fingers! I forgot to moisturize!!

For this look, I used three coats of Oodiful, which I pressed in using a cuticle pusher when the paint was not yet fully dry. I then painted in the seams first with silver, then with black hand stitching. Lastly, I painted a couple little flowers and petals using acrylic ink mixed with acrylic modeling paste for texture.


Polishes used:
Sally Hansen - Silver Sweep
black, white, red, yellow & green acrylic paints
INM - Out the Door (top coat)
acrylic modeling paste
detail brush

I hope you enjoyed these. And, because it's impossible to avoid current affairs and it isn't desirable to do so anyway, I just want to say that I hope that anybody you may know in love in Boston is safe and sound tonight. My heart goes out to everybody affected by this unconscionable and unfathomable crime.


J.

Sunday 14 April 2013

SIMPLE(R) SUNDAY: Black Day

Hello to my single readers!


Today is Black Day in South Korea. Unlike the Western world, which celebrates Valentine's Day as a one-time affair, South Koreans separate out the holiday into three parts. Technically, the 14th of every month is an obscure love-related holiday, but these three days are the main attractions:

1) 14 February: Valentine's Day: women give chocolate, preferably homemade, to their men;

2) 14 March: White Day: men give non-chocolate sweets or other gifts, preferably at a much higher value than the original Valentine's gift, to their women;

3) 14 April: Black Day: anybody who didn't receive gifts on Valentine's Day or White Day get together and eat jajangmyeon, wheat noodles in black bean sauce, to mourn their singledom.

So, though I am not single, I find the idea of single people getting together to eat a certain food on a certain day to be curiously charming in the extreme. And I thought it'd make a good subject for simple nail art!

Here's what you will need to do:

Materials! Sorry for cell phone picture, forgot to take a photo of this and then didn't want to reupload from my camera.

Step 1: paint your nails your base colour. I used Ain't No Sunshine because it seemed appropriate! It's a lovely greyed-out blue with subtle multicoloured shimmer and white flakes. It applied beautifully in two coats, like all Contrary Polish colours. I applied a coat of quick-dry topcoat to speed up drying time.


Step 2: have your handsome cat take over your lightbox because he's a butt like that.


Step 3: paint your noodles. I used You Don't Know Jacques because the wheat noodles, when covered in the sauce, take on a darker brownish colour.


Step 4: add some sauce. I used JS01 for this, which is a black jelly, but you could use a regular black polish with some thinner added, or you could wait until your noodles are dry and use watered-down black acrylic paint.


Step 5: add some shine so the sauce look saucier. I used Funny Bunny for this, a white jelly, but you could use either of the options in Step 3 to get around not having a white jelly.


Step 6: matte it! I wanted the added heart detail to stand out, so I matted the whole mani. You then have to wait for it to be completely dry. (I used a quick dry topcoat under my matte top coat to speed it up.) This is critical, otherwise the next step will pull up the paint and ruin everything!

AND THEN

Step 7: black heart! For this, I folded over a piece of tape, cut out half a heart, then peeled the tape open again. This gives a heart template, which I stuck to my nail. Make sure you get a good seal so the polish doesn't bleed! Then paint the broken heart in black polish and immediately remove the tape.


Step 8: clean up the mess along your cuticles with some acetone and a small brush, and you're done!


Polishes used:
Contrary Polish - Ain't No Sunshine
OPI - You Don't Know Jacques, Funny Bunny
GOSH - Nero
Nfu Oh - JS01
Essie - Matte About You
Scotch tape
scissors

I hope you enjoyed this tutorial. I think I will try to turn every Simple(r) Sunday into a tutorial-- let me know what you think of this idea. If it's a waste of time, I'll stop doing it! :P


J.
 
SITE DESIGN BY DESIGNER BLOGS