Showing posts with label jelly. Show all posts

Thursday, 28 November 2013

SWATCHED: Mentality Candy Jelly Holos

Nothing to Disclose -- kind of (read on)

Hello lovelies! 

Today's post comes as a result of a slight hiccough in order packing. You see, I had ordered a bunch of Mentality polishes, and awaited for them to arrive with bated breath. And then they did! And they weren't my order! It turns out that my box was mixed up with another customer's. Hillary, in an example of exemplary customer service, has shipped me my correct order, and told me to keep these lovely polishes as well (gosh, so nice!!). I figured the least I could do would be to swatch them.

So that I don't repeat myself endlessly, I'll put this all here: all of these are three coats, no topcoat. The formula on all of them was very easy to control and apply (none of these photos involved clean up!! A MIRACLE), but you'll not want to go over your strokes too much or you'll create bald spots. Because these are expressly jelly holos, they are a touch on the sheerer side; Mentality makes stamping holos as well, so if you're in for extreme opacity, you might want to look into those. All of these holos have cosmetic grade holo powder in them, not Spectraflair, so you won't be seeing rainbows in my light box. (Somehow, Mentality themselves have captured the rainbows in their swatches-- they're obviously better at corralling rainbows than I am!) Now, let's dive in!


Bon Bon is a jammy pink with slight berry undertones. I'm not a pink girl but this one is deep enough that I like it. 


Marmalade is an interesting one. In the above photo, it looks decidedly orange, but in real life I found it looked orange with a wee bit of pink to it. It made it much more approachable and wearable than straight orange (I love orange polish, but I know not everybody does).


Taffy is an acid yellow-green. I found this one almost a bit frosty, and it isn't as saturated as it looks in the above photo-- more washed out. I absolutely adore colours like these but they don't play nice with my skin tone. 


Sourball is a grass green with the slightest bit of blue to it, which pulls it away from the 'kelly green' territory and more into 'evergreen'. The weird lumps you see are my fault, I think, for applying the polish too soon after shaking it. Blame the messenger for that one.


Pastille is my faaaaavourite. It's got a wonderful tonal shimmer to it, which I hope you can see above. I love this shade of aqua, it's playful and deep without being straight teal.


Gumdrop is a Wonder Woman blue. This one looks a bit sheerer here than it was in real life.


And finally, Hard Candy is a straight purple. It's much less blue than it appears above; not that it's a violet, but it's much less of a grape. It treads that fine line in the land of purple that my camera absolutely hates. It's also not as dark and saturated as it appears-- it reminds me, if this helps, a bit of a cousin or half-sister to A England's Lady of the Lake.

Polishes used:
no base or top coat

And so there you have it! Don't worry, I haven't forgotten about the nail art I owe you-- I hope to have that up tonight or tomorrow at the latest. Hopefully it'll have been worth the wait! This little exercise gave my newfound appreciation for what swatchers do. It's a laborious process, swatching polish, and it dries the living heck out of your hands. Bow down to the master swatchers, for they live in the land of parched skin and impeccable nail polish application!

xo,

J.

Saturday, 18 May 2013

SWATCH SATURDAY: Forget You

Many moons ago, Deborah Lippmann came out with a glitter topper called Happy Birthday, and it went on to become a nail blogger darling (well, at least the original version; but I think the new version to be prettier). To me, though, while it was nice, it was missing something. It turns out that something was a black jelly base.


Suh-WOON. A rainbow jelly sandwich in a bottle! When I was in high school, I went through a phase of being what I could only describe as a 'glitter goth'. This appeals to exactly that part of me.


For this, I used two coats of Glitter A-Peel, three coats of Forget You, one coat of Glitter Food, and one coat of Seche. In spite of the coats, it isn't very thick. That's because Forget You, in spite of being very glitter-dense (no dabbing needed for this polish!), is suspended in a miraculously smooth, relatively thin jelly base. It was a real pleasure to work with, almost no clean-up required.


Look at all those layers! I love the glitters peeking through the black jelly. SO MUCH.

Polishes used:
Deborah Lippmann - Forget You
Nail Pattern Boldness - Glitter A-Peel (base coat), Glitter Food
Seche Vite (top coat)

Still trying to decide what to do for Simple(r) Sunday tomorrow! AAAaaaahh.


J.

Wednesday, 17 April 2013

Spun Sugar Gradient

I'm sorry this didn't go up yesterday! I finished these quite late at night and didn't have it in me to edit photos and write up a post. But I am doing so right now (hiyah).


For these, I started with a base of Still Waters-- it's a lovely colour deserving on its own post, and its incredible glowiness is a big part of why the jellies light up in the sunlight as above. It also applied like a dream in 2 coats; because the shimmer is almost (but not!) frosty in its intensity, you need to work your brushstrokes a bit to get them evened out, and Still Waters is probably the most indulgent polish I've worked with in months. It has an almost marshmallow squishiness to it and it stays smooth as butter for as long as you need it to. Superb.

I then dusted the tops of my nails in the turquoise glitter. Once done, I did the spun sugar technique with the three jellies, going from light green at the tips to dark green in the middle to dark teal up top. I left space for the glitter to shine through. I then topcoated it all to make it last until I could take photos today, but I won't do that next time. It takes away from the spun-sugariness.

Getting the colour balance proper on these was nigh impossible. Sorry for kinda leprotic hand colouring.


Purposefully blurry to show the glitter shininess.

Polishes used:
Liquid Sky Lacquers - Still Waters
Nfu Oh - JS34, JS35
Zoya - Frida
Duri - Rejuvacote (base coat)
INM - Out the Door (top coat)
Martha Stewart micro iridescent glitter in Wintermint

I think I'll do a painting next! I have some ideas, but it seems all my pre-planning goes off the rails lately...


J.

Sunday, 31 March 2013

Cartoon Nails with Faux Half-tone

Cartoon nails are a big thing right now. I've seen them all over the place, and I find them impossibly cute. Very clever was the person who thought this up! Triztron over at Instagram wanted to see me do cartoon nails, and I happened to have prepared this post anyway! (I'm not sure this is what she had in mind-- she is very talented at doing cartoons ON her nails-- but I can give that a shot sometime soon, too!) And because I don't like making my life easy, I thought it'd be neat to do an accent nail of a half-tone like pattern.


The cartoon nails themselves were very straightforward and I'm sure there are a bajillion tutorials up on YouTube by now, but the basic premise is to paint your nails black, then paint them the colour you want (leaving a border around the tops and sides), then adding the black stripe at the bottom, followed by the shine marks in white.


For the half-tone, I found a picture online and tried to replicate it. It didn't work. In fact, it didn't work even a little, but I like the look anyway. Sort of macro-looking. I used two jellies for this, along with a bright fuchsia and black acrylic paint.


Polishes used:
Nfu Oh - JS20
Zoya - Frida, Charisma
GOSH - Nero
OPI - Jade is the New Black, Nail Envy Matte (base coat)
Revlon Top Speed - Spirit
INM - Out the Door (top coat)
black & white acrylic paint + detailing brush

Do you like this look at much as I do?


J.

Friday, 29 March 2013

Sketches in Geometry Class

I hated geometry. I'm not the world's most maths-inclined person, but I'm especially resistent to geometry-- I nearly failed that segment of the curriculum in grade 9, only to score nearly perfect on the trigonometry segment. My teacher was very confused.

All that said, in my never-ending quest to use all of my jelly polishes, all of the time, I came up with this idea:


For this look, I started with a base of Spirit and Funny Bunny, which I topcoated to help it dry faster. In the meantime, I cut geometric shapes out of paper to which I'd stuck tape. These templates allowed me to colour in the jelly shapes and, once those were dry, use a pared-down striping brush to produce the messy, sketchy 3D-sort-of lines in black acrylic paint.

CLAW


The pinkie is my favourite <3

Polishes used:
Revlon Top Speed - Spirit
OPI - Funny Bunny
Nfu Oh - JS20, JS28, JS29, JS34
Zoya - Frida
INM - Out the Door (top coat)
black acrylic paint + striping brush

Are you a maths type, or not at all? Any time a class or subject really just kicked yer butt?


J.

Wednesday, 27 March 2013

Tutorial: Jelly Watercolour Nails

Hello!

By popular demand over at Instagram, here is a rudimentary tutorial for the jelly watercolour nails I showed you last Saturday.

We begin with two coats of the base colour (I used Funny Bunny), followed by two generous coats of a thick quick-dry topcoat such as Seche Vite or Poshé. The topcoat is important, as it protects the base colour from bleeding during the watercolouring. The base colour doesn't need to be perfect (i.e. if you use a jelly like I did, don't worry too much about unevenness) because it will largely be covered up in the end. Wait until the topcoat is very dry, or else adding other polishes and/or acetone to it will cause it to behave strangely and perhaps go all sticky/mushy.


Gather all the jellies you want to use, plus a flat brush (I used my small one-stroke brush). The brush needs to have a good-sized flat surface but the shape of the tip doesn't matter.

This one stroke brush is stained from the love of projects past. And that sounds gross now that I've typed it.


Dab a few rounded spots of your first jelly colour onto your nail, then dip your brush in pure acetone and dab the side of the brush onto your jelly spots. This is important! Do not use the tip of the brush, you'll just dig into the jelly and cause bald spots. The key is to dab with the side of the bristles so that the acetone and the jelly polish mix and the resulting liquid can be 'dabbed around' the nail. This is hard to explain, but hopefully that gives you an idea!

I have my brush angled up here because I was trying to show the pale orange liquid that formed when the jelly polish and the acetone mixed. If you dab like this, you'll remove your entire spot from your nail, or else just maim it a lot!!


This is what I ended up with after dabbing around my orange spots:


Now I'll just show you before and after shots of each of the other colours of jellies. The process is the same for each.


Once you've gone through all of your jelly colours, wait until they are dry -- this shouldn't take very long, you won't have used much polish and the acetone will speed things up -- and then clean up your cuticles with an angled brush and acetone, topcoat your creation, and you're done!


Please let me know if you have any questions at all, I'll do my best to be helpful. :)

The list of the polishes I used is in my other post, right here.


J.

Monday, 25 March 2013

Sunbeams!

Hello! Today we have sun (though it is still cold), and to celebrate the sun after about a week of snowy dreariness, I did up a cloud mani in which the tips are actually clouds:


This manicure refused to photograph properly in the lightbox, so I don't have my usual picspam for you. (Whether this is a good or bad thing is up to you!) To do this, I began with a base of Grey-t to Be Here. Once dry, I used my striping tape to mark off the lines you see, and painted in the beams with a variety of jellies. Once all the tape was removed, I painted the sun (it's actually 4 separate colours, of which you can see all of 2 in the pictures, weep) and then cloud tips, followed lastly by the little birds.


I despise flash photos, makes my fingers look all shiny, but this way you can see the shimmer in the base colour peeking through the jellies. This was more noticeable in person and very pretty!


Lastly, a close-up of Grey-t to Be Here, so you can see the flake shimmer more clearly. It's predominantly pink, but technically duochrome, going golden at acute angles. Because the shimmer is small-particle, however, that shift is pretty well imperceptible on the nail.


Polishes used:
Essence - Grey-t to Be Here, Fortune Cookie
Nfu Oh - JS20
Zoya - Katherine
OPI - Houston We Have a Purple, Y'All Come Back Ya Hear?, Funny Bunny
American Apparel - Sunshine State
Revlon Top Speed - Electric
Quo by Orly - Lemon Drop
Sally Hansen Complete Salon Manicure - Lavender Cloud
Contrary Polish - Hallelujah (limited edition mini; sent out with the full set of Love Lyrics minis)
GOSH - Nero

Back to the polish with me!


J.

Saturday, 23 March 2013

Jelly Watercolour Nail Art

Today's look is not exactly how I imagined it would turn out, but it's not bad for a first attempt. :) I've long wanted to do the watercolour technique (wherein you dab on nail polish then use them as watercolours, except with acetone instead).


For this look, I started with a base of two generous coats of Funny Bunny, which I topped with two generous coats of Poshé; this protects the base colour from the effects of the acetone. I then dabbed on Y'All Come Back, Ya Hear? and spread them around with acetone until I was happy. I did the same with Guy Meets Gal-veston, Houston We Have a Purple, Katherine, and Frida.

MY NEVER-SEEN LEFT HAND!!
I started on this hand and kept these nails simpler than the ones on my right hand. I'm not sure which look I prefer.


Once the colour dabs were dried, I covered them in another coat of Poshé. Somewhat annoyingly, the brush I was using for the watercolouring had previously been used in a foil polish, so there are little bits of microglitter in this mani that I wasn't anticipating. (Most noticeable if you zoom the above and check out the ring finger.)


Not content to leave well enough alone, I decided to try the water-spotting technique overtop:


To do this technique, you drop polish into a cup of water (use a glass cup, or a disposable plastic cup) and then, when it has spread out, you spritz the surface of the water with hairspray/perfume/hand sanitizer so that the polish starts glomming together and opening up holes, as above. You then dip your fingers into the design, remove the excess floating on the surface of the water with a cotton swab, and then spend roughly a million years cleaning up the excess polish on your skin! Yay!


This was my first time doing it, so the results are not ideal (hello, pinkie, you pain in the hiney). Through trial and error, I found that my perfume in a travel atomizer worked the best (that's what produced the index and middle fingers).

Polishes/supplies used:
OPI - Nail Envy Matte (base coat), Funny Bunny, Y'All Come Back Ya Hear?, Guy Meets Gal-veston, Houston We Have a Purple
Zoya - Katherine, Frida
INM - Out the Door (top coat)
Poshé (top coat)
pure acetone + small paintbrush

I think tomorrow will be something simpler. I'll institute Straightforward Sunday. :)


J.

Wednesday, 27 February 2013

Tortoiseshell Nails!

I received my order from Elevation Polish, including the limited edition trio of brown jellies! I will not stop until I own ALL THE JELLIES. So, of course, I had to emulate the talents of Sarah over at Chalkboard Nails and give her tortoiseshell look a try.

Shiiiiny.

It actually took quite a bit longer than I thought, which means that only my left hand is done right now. (Had I known, I'd have painted WITH my dominant hand instead.) I'm not 100% convinced that it doesn't just look like brown-toned camo, but it's pretty neat-looking.

Okay, the 'perfect hour' for photo-taking doesn't apply to nail photography.
The Elevation Polish jellies were a pleasure to work with. Very nice and smooth and not at all watery; Temperance and Cascade were more opaque while Tettegouche was more translucent. The Nfu Oh polish I used was as translucent as Tettegouche, so it worked out well-- the lighter colours were opaque enough to build over the darker colours, while the darker colours were translucent enough to not drown out the lighter ones.

Thiiiiick topcoat!
 It ended up rather bumpy because of all of the dabbed-on layers, so it took a couple good coats of Poshé topcoat to smooth it out. This created a few bubbles because apparently my Poshé has been thickening itself in secret since the last time I used it. But it isn't too bad, and not noticeable in person.

I apparently filed this nail horribly. Egads.

Polishes used:
Elevation Polish - Temperance, Cascade, Tettegouche
(NB: the trio are limited edition and the last restock will be 7 March-- but Tettegouche will be getting a new name and will join the permanent line-up)
Nfu Oh - JS 042
OPI - Nail Envy Matte (base coat)
Poshé - topcoat


J.

Monday, 25 February 2013

Failwhale February

So, this month was an exercise in nail-based humility. I could do no right. (Insert anguished gestures here.) I tried a bunch of things, and none of them worked as I wanted them to. Serves me right, probably, for the beginner's luck of completing the last objective.

FIRST: I MASSACRE OH SPLAT!

I lemmed Oh Splat! from the moment I first saw it. It's white-and-rainbow nail polish perfection. And then I went and screwed it up.

KILL IT WITH TOPCOAT

I attempted a swap mani of Oh Splat! and Orbital, with French tips in Order of the Garter. I figured this would work because A England polishes are outrageously pigmented and opaque. Order of the Garter, though a beautiful blue, needed two hefty coats to achieve opacity, by which time I was doomed to Bubble Tips™, which were only made worse by the thick coats of Seche Vite I needed to smooth out the ridiculous shelves of polish (and what do thick coats of Seche Vite always do? MICRO BUBBLES, augh):

I think my cuticles are screaming here?

Next time, I leave these beautiful glitter bombs the hell alone.

Polishes used:
KBShimmer - Oh Splat! (3 coats, works beautifully on its own)
Different Dimension - Orbital (3 coats, would recommend 2 on top of black undies)
A England - Order of the Garter (2 mortar-esque coats)


SECOND: I BRING SHAME UPON THE HOUSE OF JELLY GRADIENTS

This would have been excellent in theory, and I know how to fix it in future (a palette, a bottle of clear polish on standby, and a lot more time). I opted for a skittle mani in jelly gradients over a holo base. (I couldn't get direct sunlight, but trust me that Nfu Oh 61 is crazy-rainbows all ova the place in the sun.)

CLAWHAND

The OPI jellies are too pigmented for a smooth gradation. The Zoyas were a bit better (Frida in particular), but the net result was still too choppy for my perfectionism. Next time, I custom-mix the jellies with extra clear polish, and I work in reverse (i.e., wash of palest colour from the cuticle to the tip, and overlap layers building towards the tip, instead of the standard process of doing the tips towards the cuticles).

insert a pun about choppiness here

Polishes used:
Nfu Oh - #61 (2 coats, with Aquabase base coat!)
Zoya - Paloma (thumb), Katherine (index), Frida (ring)
OPI - Guy Meets Gal-veston (middle), Houston We Have a Purple (pinkie)


THIRD: I DO INJUSTICE TO NAILSIDE'S 80s PATTERN

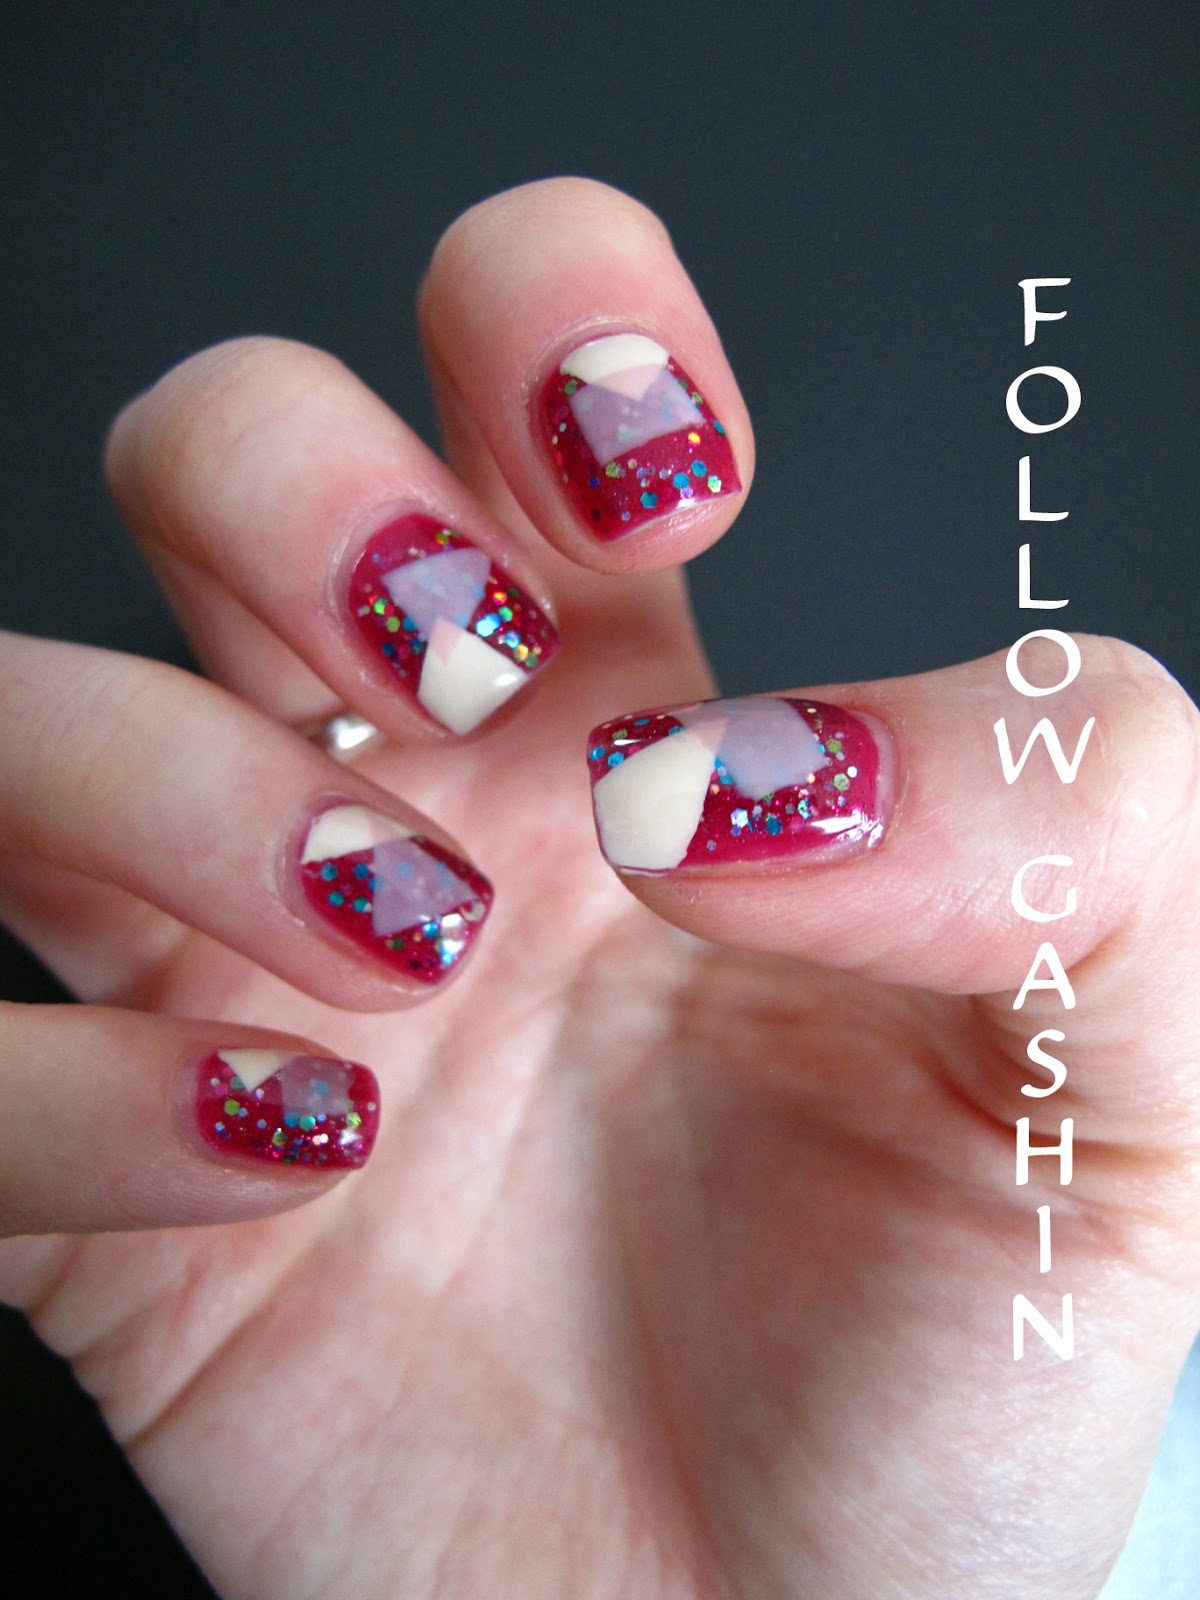
I love Nailside's abstract 80s tutorial. I think this look is genius. I definitely plan to try it again in future, having learnt: 1) do not mess with the shapes, the triangle definitely looks best in the middle; 2) for the love of baby sloths, don't do nail art on top of a glitter bomb.

Okay, in this, my cuticles are definitely screaming at me, I can hear them.

The three coats of nail polish I needed for the base made it super-thick, and with the taping on top and the top coat to smooth everything out, it was a bit of a gong show. Satellite is a fantastic, gorgeous glitter-- it goes on well (I used the dabbing method but it was not at all finicky), it sparkles like our fates depended on it, and it's bright enough to run the show. I just couldn't leave well enough alone!

Also, for reasons that escape me, my Good to Go decided that it wanted to mimic Shrinky Dinks (can you believe they named them that? who rubber-stamped that?) and came up with the most outrageous shrinkage I have ever seen. I don't even have words for this. It's like the nail polish was trying to run away from my fingers...

That's, like, a sixth of my nail plate! Come back here!!

Polishes used:
OPI - Houston We Have a Purple (2 coats)
The Polish Bar - Satellite (1 coat)
Zoya - Jacqueline (1 coat; the opaque shapes)
Spa Ritual - Calm & Clear (1 coat; the translucent shapes)


And on that note, I'm off to bed. I have something hopefully better to show you tomorrow!


J.
 
SITE DESIGN BY DESIGNER BLOGS