Showing posts with label GOSH. Show all posts

Sunday, 17 November 2013

Guest Post by Kate #2!

Nothing to Disclose

Sometimes, I do my boyfriend's daughter's nails. I don't often post about it (in fact, I've only posted about it once before), because I figure there are really only so many iterations of pink and sparkly that you need to see. But today we did something different!


We used Angry Birds stickers! Albeit sparkly Angry Birds stickers (which cause no end of trouble for my camera to focus on).


It is infinitely harder to paint on such tiny nails. Those above are slingshots (they look more like it in person, without the glare). I started by painting two coats of Blue Balloon on all her fingers, then used White On for the little clouds, Mutagen for the grass, and a combination of Dominate and Camelot for the slingshots. The birds, hands, and pigs are all nail stickers I found... somewhere... a long time ago. Sorry about that.


Polishes used:
GOSH Cosmetics - Blue Balloon
Sally Hansen - White On
Revlon - Dominate
butter LONDON - Nail Foundation (base coat)

I will have some 'real' (as in, on me) nail art for you either later tonight or tomorrow afternoon, depending on how much I feel like editing photos, haha. It'll be glowy, though, so hopefully it'll be worth the wait!

xo,

J.

Sunday, 28 April 2013

SIMPLE(R) SUNDAY: Batfight!

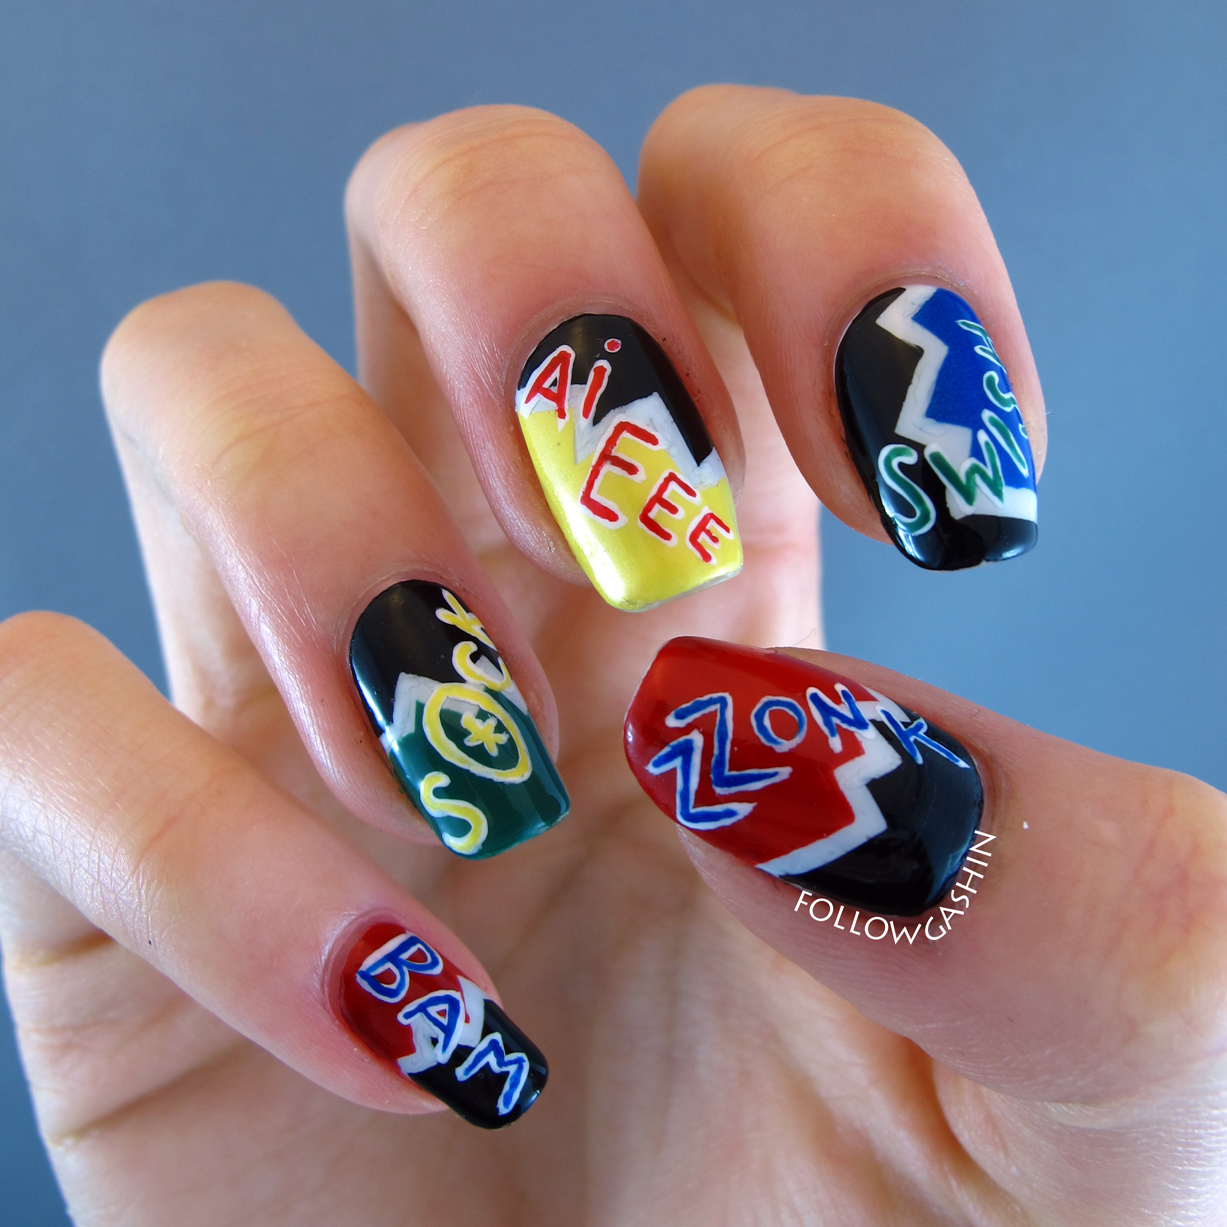
Today's nails were inspired by a few things: first, @glynnavyre on Instagram wanted to see explosion nails; second, I'm headed down to Calgary today for the Fan Expo; third, my friend Jen insisted, upon the occasion of our last hanging out, that we watch the scene in the good ol' Adam West Batman movie wherein he is struggling somewhat underwhelmingly with an inflatable shark affixed to his leg.


It was a good scene.

ZZONK is a real thing; I saw a screencap of it!!

To do this look, I used the explosion mani technique (YouTube it, it's all over the place) and simply added words in a combination of white acrylic paint and nail polish.

This is my favourite one.

Polishes used:
Layla - Velvet Effect 08
OPI - My Boyfriend Scales Walls, Jade is the New Black
Revlon - Electric
Zoya - Tallulah
GOSH - Nero
Duri - Rejuvacote (base coat)
Dior - Gel Coat (top coat-- AND LOOK AT THE SHRINKAGE, SWEET RHUBARB PIE)

All the delightful geekery in the world to you!


J.

Monday, 22 April 2013

Earth Day 2013

Hello!

It is still Earth Day (where I am) (just barely)!

I whipped these up as quickly as possible, which shows, BUT I wanted to do something because the Earth is important to me. As it should be to everybody. (I am talking to you, corporate "persons".)

This is not to scale even remotely, and it is scientifically as off the mark as it is possible to be. You've been warned.

aaaaawkwaaaard

This look is all nail polish except for the Earth, its atmosphere, and the ISS. Because that is indeed the ISS! With a heart! Cmd Hadfield takes some gorgeous photos of this planet, and his love for it is apparent, and my Canadian self is very fond of him and his every-uncle-ness. And so there you have it.

middle finger is KIND OF the milky way-- kind of

Polishes used:
GOSH - Nero
OPI - Happy Anniversary!
Revlon - Spirit
acrylic paints
one-stroke brush and detail brush
Nail Pattern Boldness - Glitter Food (on acrylics only)
Sally Hansen - Insta-Dri (top coat)

Insert Captain Planet theme song here!


J.

Sunday, 14 April 2013

SIMPLE(R) SUNDAY: Black Day

Hello to my single readers!


Today is Black Day in South Korea. Unlike the Western world, which celebrates Valentine's Day as a one-time affair, South Koreans separate out the holiday into three parts. Technically, the 14th of every month is an obscure love-related holiday, but these three days are the main attractions:

1) 14 February: Valentine's Day: women give chocolate, preferably homemade, to their men;

2) 14 March: White Day: men give non-chocolate sweets or other gifts, preferably at a much higher value than the original Valentine's gift, to their women;

3) 14 April: Black Day: anybody who didn't receive gifts on Valentine's Day or White Day get together and eat jajangmyeon, wheat noodles in black bean sauce, to mourn their singledom.

So, though I am not single, I find the idea of single people getting together to eat a certain food on a certain day to be curiously charming in the extreme. And I thought it'd make a good subject for simple nail art!

Here's what you will need to do:

Materials! Sorry for cell phone picture, forgot to take a photo of this and then didn't want to reupload from my camera.

Step 1: paint your nails your base colour. I used Ain't No Sunshine because it seemed appropriate! It's a lovely greyed-out blue with subtle multicoloured shimmer and white flakes. It applied beautifully in two coats, like all Contrary Polish colours. I applied a coat of quick-dry topcoat to speed up drying time.


Step 2: have your handsome cat take over your lightbox because he's a butt like that.


Step 3: paint your noodles. I used You Don't Know Jacques because the wheat noodles, when covered in the sauce, take on a darker brownish colour.


Step 4: add some sauce. I used JS01 for this, which is a black jelly, but you could use a regular black polish with some thinner added, or you could wait until your noodles are dry and use watered-down black acrylic paint.


Step 5: add some shine so the sauce look saucier. I used Funny Bunny for this, a white jelly, but you could use either of the options in Step 3 to get around not having a white jelly.


Step 6: matte it! I wanted the added heart detail to stand out, so I matted the whole mani. You then have to wait for it to be completely dry. (I used a quick dry topcoat under my matte top coat to speed it up.) This is critical, otherwise the next step will pull up the paint and ruin everything!

AND THEN

Step 7: black heart! For this, I folded over a piece of tape, cut out half a heart, then peeled the tape open again. This gives a heart template, which I stuck to my nail. Make sure you get a good seal so the polish doesn't bleed! Then paint the broken heart in black polish and immediately remove the tape.


Step 8: clean up the mess along your cuticles with some acetone and a small brush, and you're done!


Polishes used:
Contrary Polish - Ain't No Sunshine
OPI - You Don't Know Jacques, Funny Bunny
GOSH - Nero
Nfu Oh - JS01
Essie - Matte About You
Scotch tape
scissors

I hope you enjoyed this tutorial. I think I will try to turn every Simple(r) Sunday into a tutorial-- let me know what you think of this idea. If it's a waste of time, I'll stop doing it! :P


J.

Wednesday, 3 April 2013

Waistcoat Wednesday!

Hello lovelies!

I have a friend, Laurent, who wears a waistcoat to work every Wednesday. They are what he has christened Waistcoat Wednesdays. I appreciate the concept (I'm a Fancy Friday kind of gal), and I came across these little bows in an Essence nail art kit, so I thought I'd give the idea a whirl. :)


I did this by first painting a base of Grey-t to Be Here (I may be obsessed!), followed by the little heads in Fashion Safari. The white is all acrylic paint, as white nail polish got too gloopy. The vests are Vertigo (accent Grey-t to Be Here), Nero (accent JS03), Big Smoke, and Dominate (accent Temperance). I mattified everything before affixing the little bow ties.

The index is my favourite. :) I like the brown plaid + green.


On my thumb, I painted two lovely coats of Builder's Tea, which went on fantastically and is so beautiful I couldn't ever capture it on camera properly, but here is a close up just in case:


Polishes used:
Essence - Grey-t to Be Here
NYColor - Fashion Safari
Revlon Brilliant Strength - Dominate
Elevation Polish - Temperance (limited edition, get it now before it's gone!)
butter LONDON - Big Smoke
GOSH - Nero
Nfu Oh - JS03
Chanel - Vertigo
Essie - Matte About You
black & white acrylic paint
tiny bows from a random Essence nail art kit

I love dressing in full business wear on occasion, it brings out my androgynous side for sure. :) You? Worth it or too much hassle?


J.

Sunday, 31 March 2013

Cartoon Nails with Faux Half-tone

Cartoon nails are a big thing right now. I've seen them all over the place, and I find them impossibly cute. Very clever was the person who thought this up! Triztron over at Instagram wanted to see me do cartoon nails, and I happened to have prepared this post anyway! (I'm not sure this is what she had in mind-- she is very talented at doing cartoons ON her nails-- but I can give that a shot sometime soon, too!) And because I don't like making my life easy, I thought it'd be neat to do an accent nail of a half-tone like pattern.


The cartoon nails themselves were very straightforward and I'm sure there are a bajillion tutorials up on YouTube by now, but the basic premise is to paint your nails black, then paint them the colour you want (leaving a border around the tops and sides), then adding the black stripe at the bottom, followed by the shine marks in white.


For the half-tone, I found a picture online and tried to replicate it. It didn't work. In fact, it didn't work even a little, but I like the look anyway. Sort of macro-looking. I used two jellies for this, along with a bright fuchsia and black acrylic paint.


Polishes used:
Nfu Oh - JS20
Zoya - Frida, Charisma
GOSH - Nero
OPI - Jade is the New Black, Nail Envy Matte (base coat)
Revlon Top Speed - Spirit
INM - Out the Door (top coat)
black & white acrylic paint + detailing brush

Do you like this look at much as I do?


J.

Monday, 25 March 2013

Sunbeams!

Hello! Today we have sun (though it is still cold), and to celebrate the sun after about a week of snowy dreariness, I did up a cloud mani in which the tips are actually clouds:


This manicure refused to photograph properly in the lightbox, so I don't have my usual picspam for you. (Whether this is a good or bad thing is up to you!) To do this, I began with a base of Grey-t to Be Here. Once dry, I used my striping tape to mark off the lines you see, and painted in the beams with a variety of jellies. Once all the tape was removed, I painted the sun (it's actually 4 separate colours, of which you can see all of 2 in the pictures, weep) and then cloud tips, followed lastly by the little birds.


I despise flash photos, makes my fingers look all shiny, but this way you can see the shimmer in the base colour peeking through the jellies. This was more noticeable in person and very pretty!


Lastly, a close-up of Grey-t to Be Here, so you can see the flake shimmer more clearly. It's predominantly pink, but technically duochrome, going golden at acute angles. Because the shimmer is small-particle, however, that shift is pretty well imperceptible on the nail.


Polishes used:
Essence - Grey-t to Be Here, Fortune Cookie
Nfu Oh - JS20
Zoya - Katherine
OPI - Houston We Have a Purple, Y'All Come Back Ya Hear?, Funny Bunny
American Apparel - Sunshine State
Revlon Top Speed - Electric
Quo by Orly - Lemon Drop
Sally Hansen Complete Salon Manicure - Lavender Cloud
Contrary Polish - Hallelujah (limited edition mini; sent out with the full set of Love Lyrics minis)
GOSH - Nero

Back to the polish with me!


J.

Sunday, 17 March 2013

St. Patrick's Day Nail Art: Nyan Pot-O'-Gold!

I had ZERO inspiration for St. Paddy's Day nail art until I was lying half-awake in bed this morning. And of all things to find inspiring, an outdated meme is a weird one. I probably ate too much sunomono last night (noooo, not possible!).

May I present: Nyan Pot-O'-Gold.

I dunno guys, it seemed appropriate.

I started with a base of Passport Blue, which I coated with my 20-grade Spectraflair topcoat to give it some pizzazz (yeah, I used 'pizzazz', deal with it). I then used white acrylic paint to draw the 'shadow' of the rainbow and the pot of gold. The blacks/greys are also acrylic paint, as are the little star details. The gold is nail polish, as are all the colours of the rainbow.

I tried to make the rainbow segments shorter at the end to denote them 'fading away' (kind of), but it didn't work.


On my thumb, I kept it simple with two (amazingly easy, gorgeous) coats of Liquid Leprechaun (HOW PERFECT?!). It was smoothed out with one coat of Poshé pretty well-- I'm noticing just the tiniest bit of texture now, about an hour later, so it's probably a 2-coater, which is excellent considering how much glitter it packs.


And I leave you with this purposefully blurry double-shot to show you the sparkly goodness of the Spectraflair topcoat and Liquid Leprechaun:


Polishes used (rainbow colours are in italics):
American Apparel - Passport Blue
Indigo Bananas - Spectraflair topcoat (20-grade)
Quo by Orly - Filthy Rich
Nails Inc. - St. James
Essie - Action
Revlon Top Speed - Electric
American Apparel - Crescent Heights
GOSH - Blue Balloon
Zoya - Mira
Pretty Serious - Liquid Leprechaun
OPI - Nail Envy Matte (base coat)
Poshé (top coat)
Black & white acrylic paint

Set in Lacquer has a contest going for St. Patrick's Day nail art, so I'm thinking I will submit this there. I can't expect it'd win (good grief, it's a riff on Nyan Cat, let's be serious), but it can't hurt to try to branch out and meet new people!


J.

Thursday, 7 March 2013

Staticky TV Screens

So, remember when I said I was next going to be taking it easy? Lies.

Still with the winter thing. The street is so deeply rutted with ice that driving IN the ruts is a death wish for your car's undercarriage. I've considered hiring a Sherpa for all my travelling needs.

I was taking a look at the LeaLaC plate I ordered from Llarowe last month and was struck by the rounded rectangles (3rd row from bottom, 4th column from left). They kind of reminded me of a bank of TVs, and my mind wandered to horror tropes of static-filled TV screens, kind of like this. (Note: I don't watch horror movies, I am the least qualified person to being mining them for inspiration.)

AND THEN I thought of something much happier, which is Persona 4. I think Aegis from P3 remains my favourite Persona character of all time, but Kanji from P4 is a close second. What a dreamboat.

Soooo anyway, the TV screens! The Midnight Channel! The static! The swallowing up our brave protagonists!

The steely hair of our unnamed hero, to match his steely will! Ok I'll stop now.

Depressingly, this took about as long as the Valentine's nail art I did, except the results are nowhere near as impressive. And it was a huge pain in the butt. HUGE PAIN IN THE BUTT. There is, however, one upside-- and I will get to it in a little bit.

I'm getting more consistent with hand position, which is a small victory I suppose.

The first step was getting the static going. A full 7 steps went into building it up. I started with Nfu Oh JS03, followed by a heavy dose of the spun sugar technique (I did it MUCH thinner than XOXO Alexis Leigh is doing it in the video, but same principle) with GOSH Nero, again with the spun sugar in Revlon Spirit, then spent a dizzying amount of time dotting Nero and Spirit all over the place with my tiniest dotter, followed by another coat of JS03 and a coat of American Apparel Moon. Then NYColor Grand Central Station to get it all to dry so I could SLEEP.

DOESN'T EVEN LOOK LIKE STATIC

This afternoon, I stamped the shapes over my nails with the LeaLaC plate using Nero again, and then whipped out my tiniest brush to fill in the in-between spaces with the black polish, add teeny silver dots to represent the TV knobs, and little reflection marks in white to try to give some dimension to the TV screens. Then two more coats of topcoat to even it all out, and a bit of clean up, and finally done.

You can see some of the neurotically thin spun sugar effect going on at the edge of my nail.

But, in a way, this was a worthwhile endeavour, because I got to use Moon. (My partner has been bugging me to use it since the day I bought it and, if nothing else, this mani makes him very happy.) Because Moon DOES THIS!

This photo involved tenting a blanket over me, a self-timer, manual shutter speed, manual focus, and a slapdash process of charging up the nails by lamp, hitting the shutter, shutting off the light, and stopping breathing.

So there you have it. A mani for all of us with a soft spot for horror films and/or Japanese RPGs.

Polishes used:
Nfu Oh - JS03
GOSH - Nero
Revlon Top Speed - Spirit
American Apparel - Moon
Sally Hansen Insta-Dri - Silver Sweep
OPI - Nail Envy Matte (base coat)
New York Color - Grand Central Station (topcoat)


J.

Tuesday, 5 March 2013

FOIL MANI OF DOOM: What Happens When You Use Craft Supplies For Nail Art

Were I Taylor Swift, I'd be furiously scribbling away right now. This manicure and I are never, ever, EVER EVER getting back together. It's awful and I hate it.

I also took these photos outside in -10˚ weather, because I love you, you know.

I'm trying something with these subtler watermarks. I initially thought huge, tacky watermarks would deter stealing, but then came to the conclusion that nobody is likely jonesing to steal these, so I may as well play it classy.

Oh, foil mani, I so wanted to love you.

I found this awesome variegated foil at the neighbourhood art store and thought to myself, "Hey, Ciaté has some fancy set out with stuff like this, I bet this works just as well!" If it does in fact work just as well as this, I'm not clear on why anybody would ever buy/use it.

This is as close to a macro as I'm willing to go, and it makes me cringe.

I started with a coat of Poshé base coat (I tried nail glue over base coat first and it was a hot mess), then waited for it to be semi-dry and swiftly pressed a little square of foil into my nail, smoothing it as best I could with a couple of fingers, trying to get into the corners, etc. Didn't work. Jagged edges, breaks, holes, the whole shabang. Once I got it to a state that was at least half-decent, I gave it a light coat of CND Super Shiney top coat to seal it. Then, once dry, to cover up the awful edges, I did a box frame with black polish (should have used acrylics, my GOSH Nero is in full thickening rebellion) and my one-stroke brush. Because of the crinkly texture of the foil, it was impossible to get a smooth line, so you ain't getting a true macro of this one, sorry bub.


All in all, this took forever, I only did one hand, and I spent most of my time going cross-eyed. I think it looks pretty neat for what it is, but will leave this to more talented folks than I.

I like that my watermark is basically invisible. I think that's called defeating the purpose.

Polishes/supplies used:
Poshé quick-dry top coat
Speedball Simple Leaf metal foil in Variegated
CND Super Shiney top coat
GOSH Nero
One-stroke brush (squared-off)
Buttload of patience

Think I'm going to go for something simple next, and will be ambitious again nearing the end of the week...

J.
 
SITE DESIGN BY DESIGNER BLOGS