Showing posts with label Essie. Show all posts

Saturday, 14 December 2013

Copper Pattern

Nothing to Disclose

Hello lovelies!

Welcome to Saturday! At least, Saturday where I am. 


Today I have a very simple look for you, because I'll have to take these off sooner rather than later to do my ABC Challenge prompt (Q for quilting). But I kind of like them anyway!


This started with two coats of Lights Will Guide You, an almost black green with flake emerald shimmer and copper hexes in three sizes. It's a beautiful polish (I'm all over anything copper or rose gold, lately) but it stained my touch-up brush something fierce, so I'm somewhat wary of what'll happen to my nails. I will update this post tomorrow after removal to tell you how it went!


The designs were all done with a liner brush, a dotter, and a medium detail brush and Penny Talk. I don't know where I was going with this pattern, it just popped into my head randomly! I would have liked for Penny Talk to be more yellow-toned to go with the hexes better, but from a distance you can't really tell.


Here is a thumb macro to show you the depth and the flake shimmer!:


Polishes used:
Essie - Penny Talk
butter LONDON - Nail Foundation (base coat)
liner brush
dotting tool
medium detail brush

You know what I like about Saturdays? PANCAKES. My current partner makes pancakes for his kids and I. I love pancakes almost as much as I love waffles, and I actually own a waffle maker, so that should tell you something.

xo,

J.

Thursday, 25 July 2013

Lady Luck

Nothing to Disclose

Hello lovelies!


Sorry about the not-posting thing. Things in Real Life have been problematic lately. For instance, today I was fired! Well, not fired. I've been on medical leave for the past... numerous months... and now that I'm ready to go back to work, there is no open position for me. Hence I get a severance and sent on my way! FUN TIMES Y'ALL. But I saw this coming from a mile away, so while I am definitely hitting the wine as we speak (well, I put it down to type, I cannot type with my toes), I'm not unconsolable.


It's more that I'm choosing to see this as Lady Luck giving me the opportunity to get myself on a different path. I'm not sure what that path is, yet, but I've been working for the same one company for 8 years now (pretty well my entire adult life), and maybe a change is a good thing.

So to you, Lady Luck, I dedicate these nails.


Method on these was kind of tricksy. I began with regular base coat and ridge-filling base coat to give myself a good canvas, then I used Liquid Palisade to draw the shapes on (I did two coats for extra sturdiness). Once the shapes were dry, I painted on the white with Tempest and peeled away the Liquid Palisade. I then used my detail brush and my black and red polishes to draw on the outlines. Not my best work, but I find larger curved lines like this the hardest things to do cleanly with polish. :)

Polishes used:
Essie - ridge filling base coat
NYC - Grand Central Station (top coat)
detail brush

I have a really neat and detailed idea for what to do next, so I hope to have awesomeness to show you tomorrow or Saturday. And if you're good and eat all your veggies, I may even water marble.

xo,

J.

PS: I am currently extra-glad that all of you read this blog. This hobby has brought so much positivity and sweetness into my life, and I'm especially appreciative right now. And no, this isn't the wine talking. <3

Saturday, 29 June 2013

Main Squeeze

Nothing to Disclose

Another of my multitudinous Tryst Lacquers today -- Main Squeeze!


Main Squeeze is described as a blood orange jelly with white satin hexes and squares (in two sizes), plus orange iridescent mini glitters. In these photos, that description is pretty bang on, but in real life, the colour leans more coral than it appears here. I actually love it in photos and in person, but it tickles my coral-love bone more than my orange-love bone in reality. (That sounded awful, didn't it?) I should note that it's almost impossible to get the satin hexes out, and I'm not sure why (they aren't huge or anything). I think they just really like the sides of the bottle. Your only hope is to shake the bottle vigorously every nail or two, and I was too lazy for that. I think the polish looks lovely even without them.


Simple look tonight; started with My Vampire is Buff as the lightest, followed by Kalahari Kiss, followed by Sun Kissed, followed by blending Sun Kissed and Kalahari Kiss a bit with some Action. Doing circles with tiny brushes is a huge pain in the arse.


I am now going to continue my pic spam. These were more photogenic than some of the nails I've done recently, so I kind of went overboard.


And finally, a simple swatch of my other hand, with Main Squeeze on its own. This is more colour-accurate than the above (I think there was some attracting going on with the orange, er, oranges-- this isolates the polish better). Wouldn't it be cool if all my swatch photos turned out this good? Something was working well tonight...


Polishes used:
Cult Nails - Scandalous (1 coat as undies just for some added opacity, didn't change the colour)
OPI - My Vampire is Buff
China Glaze - Kalahari Kiss
Sally Hansen - Sun Kissed
Essie - Action
Nail Pattern Boldness - Glitter A-Peel (base coat), Glitter Food
NYC - In a New York Minute (top coat)

Hey, here's a fun fact for you: my left hand poses so much better than my right hand, which is tragic. Why? Because, in Grade 7, a kid named Ryan was teasing my friend Allie and keeping some book or other away from her and I went to punch him in the stomach for it, except I missed and hit his hip bone and broke something in my hand. It only occurred to me that I broke something many years later, when a nail tech was massaging my hand and asked if I ever broke it. I guess Grade 7 Jolène assumed that being unable to close her right hand for a whole month was standard post-punch process?

xo,

J.

Wednesday, 26 June 2013

Chalkboard Nails

Nothing to Disclose

... Not as in the extremely talented nail blogger. As in nails that are meant to look chalkboard-ish.


Doing chalkboard nails was the idea of one of my lovelies over on Instagram. I regrettably haven't run very far with it, but it's a fun look for when you're feeling lazy!


This look began with two coats of Camelot (best black ever), followed by some sponging of Marble for the dust effect, then Filthy Rich for the chalk holder along the bottom. Text is done with Tempest, and the whole is coated in two thick coats of Matte About You.


On the subject of which -- you notice the dots that are distinctly whiter and sharper than the sponging? Those are weird calcifications in Matte About You. Has this happened to anybody else? I have no idea what they're doing but I strongly disapprove. In this case, they sort of blend in, but I've had them nearly ruin a manicure before. Time to consult Missy's informative Iron Polish post on matte topcoats and get myself a butter LONDON matte topper, I think!


Can anybody guess what the equation is? Any maths nerds out there? Show yourselves, ain't no reason to hide! I'll write it below in white text, highlight it and read if you're hopeless at maths like me:

The theory of general relativity as formulated by our good friend Einstein. :)

Polishes used:
Spa Ritual - Marble
Quo by Orly - Filthy Rich
Essie - Matte About You (top coat)

I have some seriously awesome posts coming up in the next few days -- a W-themed mani, and another crack at paisley print, so I hope you'll look forward to those!

xo,

J.

Monday, 20 May 2013

Studs and Spots

Hello lovelies,

I sat down to do a complex architectural mani for a contest, and found out that I had zero energy for it. Nada. So I decided to play with texture instead.


Water spotting looks cool when it works, but it is even more finicky than water marbling. Here's why: TWO variables (polish and spray) instead of one (polish). You could find a polish that works well for spotting, but your hairspray (e.g.) doesn't work at all, or some permutation of the above. Nutso. These two polishes also spotted into a completely different way, which I thought was neat!


Nonetheless, this mani (after much trial and error) didn't turn out badly. I think it looks pretty cool. The base is 1972, which is a much pinker lavender in real life, but everything going on made my camera unhappy. :) It was glorious to apply, as all la couleur couture polishes are; I also think they have my single favourite brush of all time.


Polishes used:
Essie - Penny Talk
Nina Ultra Pro - French White
hairspray
tape (to cover fingers)
1.5mm silver studs
Duri - Rejuvacote (base coat)
Seche Vite (top coat)

As I mentioned yesterday, I'll be taking the week off to try to get my hands/nails/cuticles back to a healthy state, because they are incredibly unhappy right now. I will play it by ear as I go. I'm also finding that I've run out of steam when it comes to nail art, so I think taking a short break will do me good. Absence, fonder heart, blah blah blah!

See you soon! ;)


J.

Friday, 10 May 2013

Candied French

Hello! I thought this one would be easy to knock out both hands in a couple hours, la di da.


FALSE.


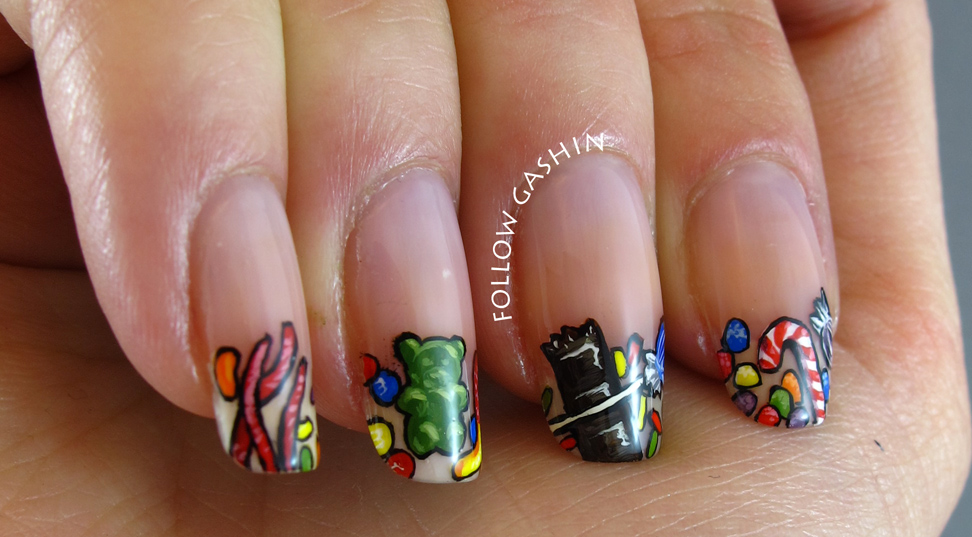
This look was inspired by the delightful confectionary nail art of @glitterfingers. Her linework style is so unique, and I love it, and I have obviously not come anywhere near it. But this is still kind of a homage to her work. (I have covered up my free edges in designs because they are irredeemably stained.)

The gummy bear is my favourite.


This began with a coat of ridge filling base coat, followed by a coat of Nail Glow. I then painted everything in acrylics and sealed it all with Seche Vite.


Polishes used:
Essie - Ridge Filling (base coat)
Dior - Nail Glow
acrylic paints in pretty much every colour
detail brush and überdetail brush
Seche Vite (top coat)

What do you think of this one? Worth the effort??


J.

Wednesday, 24 April 2013

Sideways Rainbow Braid Nails

This was going to be SO GOOD. Like most things I've tried lately, it didn't quite work out that way. It's not a total disaster, it just isn't the awesomesauce I was expecting.


I've been seeing a lot of braid nails around, so I thought I'd give it a shot, but sideways, and rainbow. All things are usually better when rainbow. A lot of the colour variations aren't showing up in the photos (especially the pinky; those are 3 very distinct colours of purple, not that anybody would ever know!). This was terrible to clean up, so please don't examine my cuticles-- they're a war zone. :P


And then I bumped my ring finger and pinky while making dinner. Sadpanda.


Polishes used:
Layla - Softouch Effect 08
Inglot - 724
Sally Hansen Insta-Dri - Pronto Purple, Cinna-Snap
Essie - Action
American Apparel - Lopez Canyon, Sunshine State, Crescent Heights
OPI - My Paprika is Hotter than Yours
Zoya - Shawn, Sylar, Mira
Revlon Top Speed - Electric
Duri - Rejuvacote (base coat)
Sally Hansen Insta-Dri (top coat)
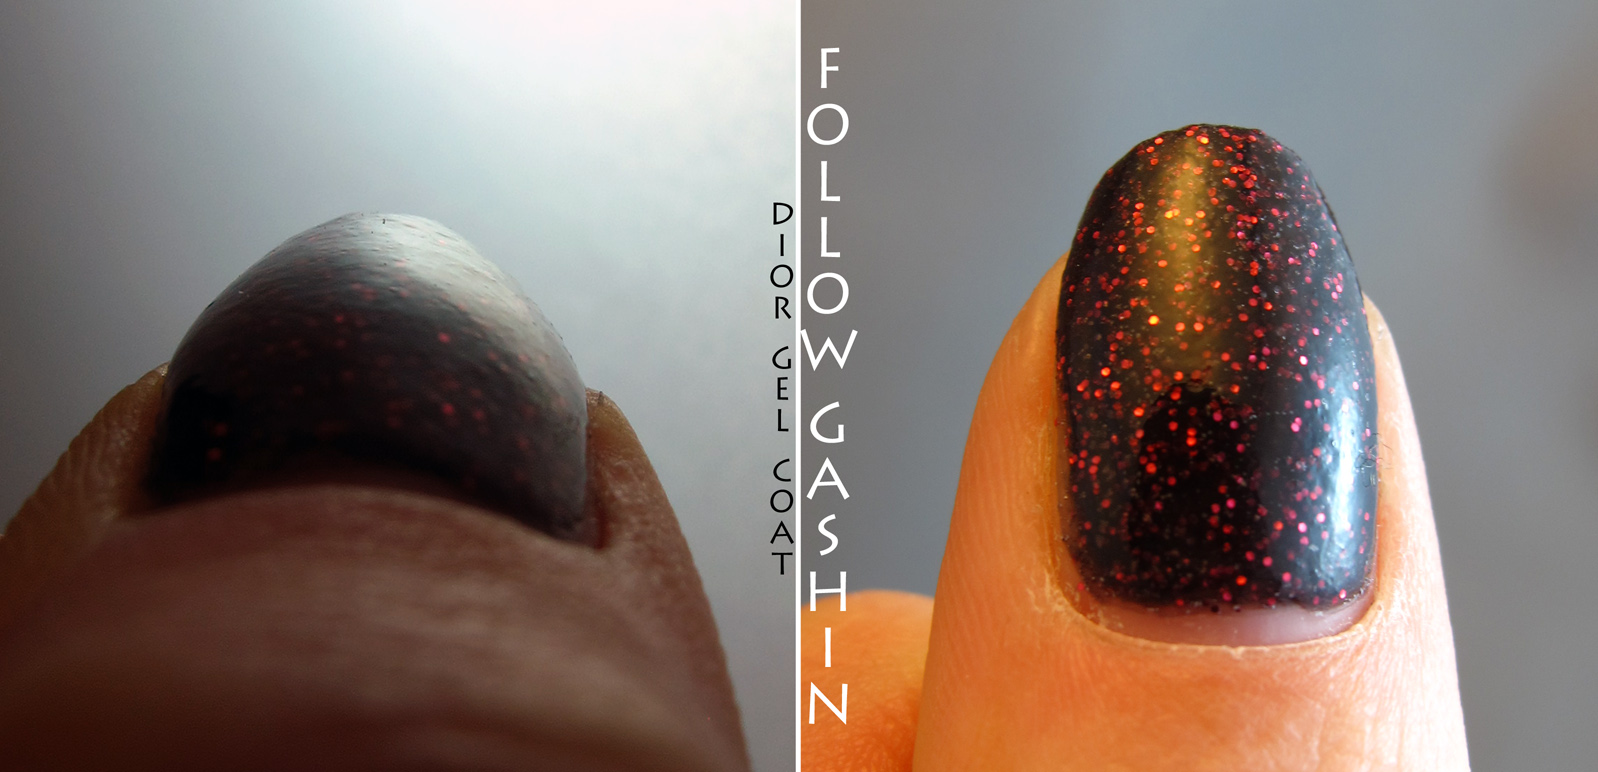
Dior Gel Coat (top coat)

Until my next outrageous and unfulfilled adventure, my darlings!


J.

Sunday, 21 April 2013

Golden Poppies

Hello lovelies. :)

I've been cogitatin' about a tattoo design for a very dear friend of mine and she loves Mucha's poppies, understandably so, which put me in mind of poppies in general. The unbelievably talented Nail Artist (IG: @riddhisn) is having a Floral/Brand/Sport contest, so I thought I'd enter these, even though they didn't come out even remotely as wonderfully as they exist in my head. As usual.


For this, I began with a base of Tallulah (for opacity-- one coat wonder!) and Order of the Garter (for the shade of blue I wanted). I then did the poppies in acrylics, and outlined it all in Filthy Rich very painstakingly with a nail art fountain pen. I then gave it glitter food and a coat of matte top coat. To make the poppies stand out a bit more, I went over them with shiny topcoat. (This effect is more noticeable in person.)


Polishes used:
Zoya - Tallulah
A England - Order of the Garter
Quo by Orly - Filthy Rich
acrylic paints in a variety of colours
one-stroke brush, detail brush, nail art fountain pen
Nail Pattern Boldness - Glitter Food
Essie - Matte About You
Poshé topcoat (only on the poppies)

Here's hoping you guys like these more than I do! I'm allowed two entries to the contest, so you'll probably have another floral coming your way in the next couple of weeks.


J.

Sunday, 14 April 2013

SIMPLE(R) SUNDAY: Black Day

Hello to my single readers!


Today is Black Day in South Korea. Unlike the Western world, which celebrates Valentine's Day as a one-time affair, South Koreans separate out the holiday into three parts. Technically, the 14th of every month is an obscure love-related holiday, but these three days are the main attractions:

1) 14 February: Valentine's Day: women give chocolate, preferably homemade, to their men;

2) 14 March: White Day: men give non-chocolate sweets or other gifts, preferably at a much higher value than the original Valentine's gift, to their women;

3) 14 April: Black Day: anybody who didn't receive gifts on Valentine's Day or White Day get together and eat jajangmyeon, wheat noodles in black bean sauce, to mourn their singledom.

So, though I am not single, I find the idea of single people getting together to eat a certain food on a certain day to be curiously charming in the extreme. And I thought it'd make a good subject for simple nail art!

Here's what you will need to do:

Materials! Sorry for cell phone picture, forgot to take a photo of this and then didn't want to reupload from my camera.

Step 1: paint your nails your base colour. I used Ain't No Sunshine because it seemed appropriate! It's a lovely greyed-out blue with subtle multicoloured shimmer and white flakes. It applied beautifully in two coats, like all Contrary Polish colours. I applied a coat of quick-dry topcoat to speed up drying time.


Step 2: have your handsome cat take over your lightbox because he's a butt like that.


Step 3: paint your noodles. I used You Don't Know Jacques because the wheat noodles, when covered in the sauce, take on a darker brownish colour.


Step 4: add some sauce. I used JS01 for this, which is a black jelly, but you could use a regular black polish with some thinner added, or you could wait until your noodles are dry and use watered-down black acrylic paint.


Step 5: add some shine so the sauce look saucier. I used Funny Bunny for this, a white jelly, but you could use either of the options in Step 3 to get around not having a white jelly.


Step 6: matte it! I wanted the added heart detail to stand out, so I matted the whole mani. You then have to wait for it to be completely dry. (I used a quick dry topcoat under my matte top coat to speed it up.) This is critical, otherwise the next step will pull up the paint and ruin everything!

AND THEN

Step 7: black heart! For this, I folded over a piece of tape, cut out half a heart, then peeled the tape open again. This gives a heart template, which I stuck to my nail. Make sure you get a good seal so the polish doesn't bleed! Then paint the broken heart in black polish and immediately remove the tape.


Step 8: clean up the mess along your cuticles with some acetone and a small brush, and you're done!


Polishes used:
Contrary Polish - Ain't No Sunshine
OPI - You Don't Know Jacques, Funny Bunny
GOSH - Nero
Nfu Oh - JS01
Essie - Matte About You
Scotch tape
scissors

I hope you enjoyed this tutorial. I think I will try to turn every Simple(r) Sunday into a tutorial-- let me know what you think of this idea. If it's a waste of time, I'll stop doing it! :P


J.

Friday, 12 April 2013

Wedgwood China Nail Art

Hey lovelies! I'm sorry for my radio silence for most of the past week; a cold kicked me in the butt and my sinuses and I remain in a protracted battle even as a type this. BUT, I'm feeling better enough for some nail art!

I noticed I'd banged up the index after this photo, and fixed it in the rest. Sorry for the unsightliness!

For this look, I wanted something very fluid, very organic, very imperfect. So I started out with a base of 3 coats of Bella-- which is to die for, it's squishy and perfect and at 3 medium coats it self-levels like a champ. But it also takes forever and a year to dry-- you have been warned. I then painted on all of the details with indigo fountain pen ink and a tiny brush. I took my inspiration from photos of Wedgwood China I found through Google Image Search.


Polishes used:
Duri - Rejuvacote (base coat)
Rescue Beauty Lounge - Bella
Essie - Matte About You (top coat)
Diamine Old English Fountain Pen Ink - Indigo (painted on top of matte top coat)
detail nail art brush

I have many more plans for the upcoming days, provided I win this microbial war, so stay tuned!


J.

Sunday, 7 April 2013

Iron Polish: Glitter Food Edition

WELCOME TO MANICURE STADIUM


(please don't sue me)

I own a lot of top coats that are intended to smooth out glitter. As many know only too well, glitter can be very 'hungry' and gobble up endless coats of topcoat without batting a proverbial eye, all while remaining rough like taunting sandpaper. There's a small industry within the nail community dedicated to finding ways to smooth out dem glitterbombs, and today I'm weighing in on 10 of them.


For this epic showdown, I began by painting two coats of OPI's Stay the Night on each finger-- because this is a 'first formula' Liquid Sand polish, it is VERY textured, and therefore a good candidate. I then painted on two coats of each type of 'glitter food', using what I would call medium/generous coats (neither thin, nor glooping it on). I then waited an hour, evaluated what the glitter was feeling like, and recorded it. I thereafter went to sleep for about 7 hours, woke up, and recorded once more how the glitter was feeling. Results are below (pardon the dry cuticles in the photos; I was running around that morning and forgot to prep for photos properly).

A few notes: I've done some swapping out, so now my Seche Vite, Poshé top coat, and Good to Go are all slightly thickened, but only as much as would be considered 'average' (not brand new, not in need of any polish thinner whatsoever, able to be applied in a floating manner but do not typically produce shrinkage). I have not evaluated these top coats for drying time; the only one I noticed took longer to dry than the others was the Maya Cosmetics one-- it got some ridges overnight that the others did not, but not due to the product settling into the glitter. I've therefore evaluated it based on its general characteristics, not the ridged spot.

LEFT HAND, THUMB TO PINKY: Gelous, Poshé top coat, Nail'd It Glitter Frosting, Maya Cosmetics Smoothing Coat for Glitter, Seche Vite

RIGHT HAND, THUMB TO PINKY: Dior Gel Coat, Nail Pattern Boldness Glitter Food, Poshé base coat, Essie Good to Go, INM Out the Door

INITIAL IMPRESSIONS: Good to Go and Seche Vite are the same, two coats give good smoothness after about 20 minutes; Nail Pattern Boldness does not self-level; Maya and Dior both seem to be working, but have created a multitude of little air bubbles between each piece of glitter.

AFTER AN HOUR:
Gelous - gritty
Poshé top coat - relatively smooth
Nail'd It Glitter Frosting - semi-gritty
Maya Cosmetics Smoothing Coat for Glitter - very smooth
Seche Vite - relatively smooth
Dior Gel Coat - very smooth
Nail Pattern Boldness Glitter Food - super smooth
Poshé base coat - gritty
Essie Good to Go - very smooth
INM Out the Door - gritty

AFTER 7 HOURS:

Gelous - gritty:


Poshé top coat - 85% smooth, very small amount of shrinkage:


Nail'd It Glitter Frosting - gritty:


Maya Cosmetics Smoothing Coat for Glitter - semi-gritty, lots of bubbles!:


Seche Vite - 80% smooth:


Dior Gel Coat - 95% smooth:


Nail Pattern Boldness Glitter Food - 95% smooth, would be 100% with shiny top coat:


Poshé base coat - gritty:


Essie Good to Go - 80% smooth:


INM Out the Door - gritty:


I hope this comparison has been useful to you! I have another one like this planned, to compare quick-drying top coats, but if there's anything else you'd like to see in this vein (i.e. no colour comparisons, I don't have a big enough stash to be useful on that front!!), please let me know!


J.
 
SITE DESIGN BY DESIGNER BLOGS