Showing posts with label holo. Show all posts

Sunday, 19 January 2014

SIMPLE SUNDAY: Retro Fishtail

Nothing to Disclose

Hello lovelies!

SURPRISE! I have a post for you! I am probably on a plane right now, but I wore this look for a dinner out on Friday and I decided I wanted to share it with you.


PINK NAILS PINK NAILS WEE OO WEE OO. Seriously I don't think I've had pink nails since I was 10. I'm calling this a retro fishtail because the colours seems very... "70s wallpaper" to me.


This started with three coats of Mt Augustus (which is paler in real life, sort of a bright pastel pink with coral leanings), followed by two coats of Pastille for the upper fishtail, and one coat of Educate for the lower fishtail. Some studs, and done!

This shot gives you the shimmer in Mt Augustus, the holo in Pastille, and the green flakes in Educate.

Polishes used:
Elevation Polish - Mt Augustus (which I think got discontinued?)
Mentality Nail Polish - Pastille, Educate
Duri - Rejuvacote (base coat)
1.5mm studs from Born Pretty Store

Okay, now FOR REAL I'm leaving you all for a week. You can follow my adventures on Instagram, I'll try to post interesting photos about my trip there!

xo,

J.

Monday, 2 December 2013

Winter Skittle

Nothing to Disclose

Hello lovelies!

Tonight I have a skittle for you, which is a phenomenon relatively unheard of, from me.


I was running low on inspiration and so I thought it might be nice to indulge in The Season and do a winter/holiday-theme skittle. It helps that we've received a foot of snow over the past 24 hours and all I really want to do is curl up in bed with hot cocoa and never set foot outside ever again...


I started with a base of two careful coats of All Bidness, a black linear holo with gold flakes (I took some photos in direct light to show the holo, and others in indirect light to show the flakes). So here's the thing-- it was crazy thick. I pre-ordered a few CbL polishes and all of them are thick thick thick. I don't know if this is unique to the pre-order session I took part in, but I needed to let you know. Some polish thinner should fix everything up just fine, though, and in all other respects these polishes are lovely.


I then painted on all the designs with white acrylic paint and a combination of various striping and detail brushes. Yes, I realise that I have an eight-pointed snowflake, a thing that Does Not Exist. It occurred to me after the fact, thank you for not passing too hard a judgment on my poor soul. ;)


Polishes used:
Colors by Llarowe - All Bidness (the holo is stronger than my photos show!!!)
Duri - Rejuvacote (base coat)
white acrylic paint
liner brush
detail brush

I am seriously so low on inspiration these days, I have no idea why. I think it's because all of my mental energy is going into finding myself a place to live, come January, AND finding myself a job to afford a place to live. Ay carumba. It's a mess.

xo,

J.

Thursday, 28 November 2013

SWATCHED: Mentality Candy Jelly Holos

Nothing to Disclose -- kind of (read on)

Hello lovelies! 

Today's post comes as a result of a slight hiccough in order packing. You see, I had ordered a bunch of Mentality polishes, and awaited for them to arrive with bated breath. And then they did! And they weren't my order! It turns out that my box was mixed up with another customer's. Hillary, in an example of exemplary customer service, has shipped me my correct order, and told me to keep these lovely polishes as well (gosh, so nice!!). I figured the least I could do would be to swatch them.

So that I don't repeat myself endlessly, I'll put this all here: all of these are three coats, no topcoat. The formula on all of them was very easy to control and apply (none of these photos involved clean up!! A MIRACLE), but you'll not want to go over your strokes too much or you'll create bald spots. Because these are expressly jelly holos, they are a touch on the sheerer side; Mentality makes stamping holos as well, so if you're in for extreme opacity, you might want to look into those. All of these holos have cosmetic grade holo powder in them, not Spectraflair, so you won't be seeing rainbows in my light box. (Somehow, Mentality themselves have captured the rainbows in their swatches-- they're obviously better at corralling rainbows than I am!) Now, let's dive in!


Bon Bon is a jammy pink with slight berry undertones. I'm not a pink girl but this one is deep enough that I like it. 


Marmalade is an interesting one. In the above photo, it looks decidedly orange, but in real life I found it looked orange with a wee bit of pink to it. It made it much more approachable and wearable than straight orange (I love orange polish, but I know not everybody does).


Taffy is an acid yellow-green. I found this one almost a bit frosty, and it isn't as saturated as it looks in the above photo-- more washed out. I absolutely adore colours like these but they don't play nice with my skin tone. 


Sourball is a grass green with the slightest bit of blue to it, which pulls it away from the 'kelly green' territory and more into 'evergreen'. The weird lumps you see are my fault, I think, for applying the polish too soon after shaking it. Blame the messenger for that one.


Pastille is my faaaaavourite. It's got a wonderful tonal shimmer to it, which I hope you can see above. I love this shade of aqua, it's playful and deep without being straight teal.


Gumdrop is a Wonder Woman blue. This one looks a bit sheerer here than it was in real life.


And finally, Hard Candy is a straight purple. It's much less blue than it appears above; not that it's a violet, but it's much less of a grape. It treads that fine line in the land of purple that my camera absolutely hates. It's also not as dark and saturated as it appears-- it reminds me, if this helps, a bit of a cousin or half-sister to A England's Lady of the Lake.

Polishes used:
no base or top coat

And so there you have it! Don't worry, I haven't forgotten about the nail art I owe you-- I hope to have that up tonight or tomorrow at the latest. Hopefully it'll have been worth the wait! This little exercise gave my newfound appreciation for what swatchers do. It's a laborious process, swatching polish, and it dries the living heck out of your hands. Bow down to the master swatchers, for they live in the land of parched skin and impeccable nail polish application!

xo,

J.

Tuesday, 26 November 2013

Deconstructed Snowflakes

Nothing to Disclose

Hello lovelies! Just a quick post tonight, as I'm off babysitting with my friend Andrew and we literally just took the toilet apart because one of the kids threw a toy train down it earlier in the day and it was irredeemably clogged. Ah, children. Little bundles of joy and unrestrained havoc.


Anybody who follows me on Instagram or Facebook saw something sort of vaguely like this that I did yesterday. Well, that started chipping almost immediately (blasted Marc Jacobs polish!!), so I decided to redo it in more seasonal colours.


All of this vertical-line-ness started with my seeing this manicure by the inimitable Spifster. She's an amazing nail artist and you should be following her. At any rate, I could do various iterations of this design over and over again forever.


I started with three coats of Dream, and the white is Tempest, all done with my striping brush and a dotting tool. With these seasonal colours, I thought I'd do something that looked, well, seasonal. When I finished, I thought it looked like Picasso's take on snowflakes, hence the title of this post.


Polishes used:
Zoya - Dream
butter LONDON - Nail Foundation (base coat)
striping brush
dotting tool

Like I said, expect more of this kind of thing from me in future! But I will go a bit more detailed in my next nail art for you, my lovely readers, because you're here for the Good Stuff. ;)

xo,

J.

Saturday, 2 November 2013

SNAPSHOTS: Hallowe'en and Movember

Nothing to Disclose

Hello lovelies! You know what the worst thing is? Moving house. It is actually the worst thing. It is an all-engulfing maw into which my past week disappeared entirely. I actually don't even remember most of it. I have nubbins to show for it, though. Moving also destroyed my nails and cuticles-- ick.

But I made it through! And I have two manis to show you quick quick.


First up is my Hallowe'en mani. I apologize for the image quality; I used my iPad to take the photo in less-than-ideal light. I used white and black acrylic paint on a base of the franken I'd made a while ago. I happen to think my little Jolly Rogers are quite cute!


Second up is my Movember mani! I started with a patchwork base of Magia, Cosmic Fate, Eternal Beauty, and Kismet. The holo is evident in direct light and throws wonderful rainbows! I then used white and brown acrylic paint for the different moustaches. The middle finger is dedicated to Cmd. Hadfield. ;)

Polishes used:
Franken I'd made a while ago...
Color Club - Cosmic Fate, Eternal Beauty, Kismet
Jade - Magia
Duri - Rejuvacote (base coat)
la couleur couture - 2013 (top coat) (note: putting top coat on these holos doesn't kill the rainbow effect!)

Back atcha lovelies with more nail art soon! I have an idea for an autumnal mani (I say, as I look outside and everything is blanketed in snow...), plus it's Digit-al Dozen week next week! Hang tight, I promise to be more present! :)

xo,

J.

Wednesday, 9 October 2013

Law of Attraction

Nothing to Disclose

Hello lovelies!

So this is the polish I was drooling over in Sephora:


It's called Law of Attraction and is very aptly named. Unfortunately, it applies like molasses. It's thick as all get-out; shown are three coats which, when given the two coats of Glitter Food it needed and the coat of topcoat to smooth it all out, made for a seriously thick nail. No fun. But it's a canvas, and it needed something!


Random geometric blobs! It's seriously the only thing I could think of that would stand a chance against all that bling. I don't HATE them, but I don't like them, either. They're coming off ASAP. But I can't only show you my successes, can I? ;)


Blobs are all acrylic paint. I wish my white acrylic paint were more opaque. Next time I do something like this, I'll be using my KONAD stamping polish, I think.


I'm really excited! For reasons that have nothing to do with this manicure, but I'm going to tell you Right Here anyway because I hate having photos back-to-back without any text in-between them!! I started a pastels course in the fall of 2010 but only made it to three classes (out of 8) before my schoolwork and exams caught up with me. And I just signed up for the same course again, and am starting tomorrow evening! I'm pretty stoked. I really enjoyed it, last time, and my creativity could use a boost.

Zoom this photo: this polish is so full of bling that not even my lightbox could kill all of the holo!

Polishes used:
Formula X for Sephora - Law of Attraction
Elmer's glue (base coat)
white acrylic paint
striper brush

Would you like to see photos from my pastels class in future updates? I will probably include them until someone tells me to stop, hehe...

xo,

J.

Friday, 21 June 2013

Aqueous

Nothing to Disclose

Good evening, lovelies! Another Tryst Lacquers custom polish for you today: Aqueous.


To show this beauty off, I decided on another skittlette. (I'm planning on something more oomph-ish for tomorrow, thus inverting the posting order I have established. Yay?)


All fingers started with a base of 4 coats of Aqueous. This sounds like a lot, but it went on very smooth and thin-- it's a true jelly, to let all the shimmer types through. If many layers annoy you, putting it on top of something like OPI's Ski Teal We Drop would be an excellent alternative. It leans a bit more green than the photos are showing, making it a perfect deep teal. My middle and ring fingers have a simple water marble done with White On and Nail Envy, and my pinkie has two coats of Trash Glam (because it is Quo by Orly, it is as far as I can tell a dead-on dupe for Orly's Sparkling Garbage, but maybe a bit denser glitter-wise). I focussed the above photo on my index so that the blurred out pinkie could hint at the holo goodness of Trash Glam. It's a party in a bottle, that one.


The above helps to show you the complexity of the base polish, but I wasn't satisfied. Oh no. Kimberly took my vision for a water polish and knocked it straight out of the park, so I decided that the world needed MACROS. Here's Aqueous in lightbox compact fluorescent lighting (this one is pretty well colour accurate) and indirect natural lighting:


If you aren't ready to pounce, you may have a fever-- please consult a doctor. But in all seriousness, like with all of my custom Tryst creations, I've allowed Kimberly to sell this baby to anybody who wants it, so if you're drooling, fire her off a note!

Polishes used:
Tryst Lacquers - Aqueous (custom)
OPI - Nail Envy (clear, for water marbling)
Sally Hansen - White On
Quo by Orly - Trash Glam
Duri - Rejuvacote (base coat)

Until tomorrow, my lovelies!

xo,

J.

Sunday, 19 May 2013

SIMPLE(R) SUNDAY: Glitter Lines

Hello lovelies,

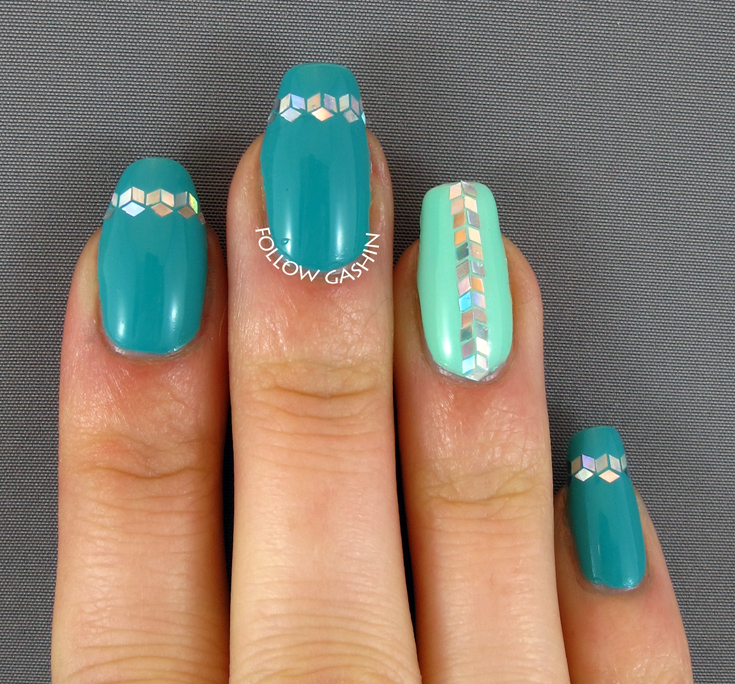
I'm not sure what to make of this one. On the one hand, the basic principle isn't difficult (though mastering the method is). On the other hand, it takes forever. So, if you are an impatient person like I am, this look is very difficult.

Sorry I look jaundiced; I was trying to get the polishes colour-accurate.

I started with a base of 1977, with Honey Dew on my accent finger. I then coated my thumbnail with a non-quick-dry Duri top coat I had kicking around, licked the tip of a toothpick, and began to place the little holo diamond glitters.


I repainted top coat as needed to make sure the glitter would stay put. I had a pair of cuticle nippers handy in case any pieces of glitter went awry, which of course they did, in order to gingerly pick them up off of wherever on my nail they decided to alight. Oh, and cursed. I cursed a lot.


For the queen bee of glitter placement, I invite you to check out Polish All the Nails. I think Laura might be a superhero. A glitter superhero. She also has very handy tutorials on how to do stuff like this. Hint: start in the middle!!

The sunshine didn't want to play with the holo; boo!

Polishes used:
la couleur couture - 1977
piCture pOlish - Honey Dew
Duri - Rejuvacote (base coat)
Duri - non yellowing top coat
Seche Vite (2 coats)
toothpick
loose holographic diamond glitter
patience
loss of patience
loss of mind

I'm thinking of doing one more manicure tomorrow for a competition on Instagram, then it's a solid 5 days of naked nails for me-- gotta let them breathe, and try to get my cuticles in line again.


J.

Saturday, 27 April 2013

Swatch Saturday: Bathed in Light

Oh, holy moly. This polish. Just look at it. This is the polish you wear to work and then people gape when you go outside in the afternoon. This is Bathed in Light, by Dandy Nails.


The above is the multi-chromatic goodness as it appears indoors. I loooove the pink with greenish edges. The base colour is actually a greyed-out blue, which shows up at acute angles (you'll see).

In direct light, the pink goes all flaming on us, and the holo glitter comes to life:


Here is that blue-grey I was telling you about:


The full shift:


Lastly, a blurry photo to show the holo glitter at work:


Polishes used:
Duri - Rejuvacote (base coat)
INM - Out the Door (top coat)

Delicious, right?!


J.

Saturday, 13 April 2013

Swatch Saturday: El Cap

At the request of my friend Megan, who wanted to see more plain swatches from me (in a fit of frustration at nail art, I think), I've decided to institute Swatch Saturday! Every (or almost every) Saturday, I will post photos of a simple manicure, sans nail art.

Today, I have Elevation Polish's El Cap, topped with accent nails of Cirque's XX.


My camera had a heck of a time picking up the true nature of the shimmer in El Cap in the lightbox, and it was a dreary day outside so I couldn't use the sun to my advantage. El Cap is a sort of dark cornflower blue with electric violet shimmer, and is a dream to apply. Anywhere in the following photos where you see a pink/violet shimmer, know that that's what the polish actually looks like in regular lighting.


A couple of close-ups here to show the holographic goodness of XX. These were 1 thick, dabbed-on coat per nail.


Polishes used:
Elevation Polish - El Cap (should be restocked in May)
Cirque - XX
Duri - Rejuvacote (base coat)
Nail Pattern Boldness - Glitter Food
Poshé - top coat

I have a simple nail art look for you tomorrow, and then a failwhale extravaganza for Monday, but I hope to give you something awesome to look at on Tuesday, so sit tight!


J.

Sunday, 24 March 2013

SIMPLE(R) SUNDAY: Fleur-y of Flowers with Purple Holo Stripe

I recently discovered a new-to-me polish brand from Canada: Tryst Lacquers. I snapped up Jaded, Fleur-y of Flowers, and Just a Crush. I've used Jaded by now (it's the background to my Yoda), and today I'm using Fleur-y of Flowers. I really can't say enough about how much I love these polishes. They are what happens when you take lovely crellies and mix in the perfect amount of micro and micronic glitter-- complexity without being overwhelming. I've included a bottle shot at the bottom to show you just how complex this pretty is.


I started with two easy coats of Fleur-y of Flowers (two medium coats or three very thin coats gives perfect opacity, and it self-levels well). Because I love the polish so much, I wanted it to be the spotlight, so I kept the accent nails bare. I then taped off the middle sections of my other fingers, and painted on stripes of (top to bottom) Euphoria, Lady of the Lake, and Misty Blush-- all purple-toned holographic polishes.


As it were, I am terrible at taping straight vertical lines on my nails, because they were a hot mess. I touched the sides up with my detailing brush.

To get an idea of the holographic goodness, we need flash!


As you can tell, Misty Blush is the most holographic of the three, and is a linear holographic. Lady of the Lake is a scattered holo, and Euphoria is a linear, though more subdued.

Here is a crappy phone pic to show you how this looked in the sun. It manages to be very eye-catching while still being very simple.


Lastly, that bottle shot I promised you. The frosty pale blue glitters are amazing, and the multitude of micronic glitter get me every time: black, blue, red, silver, gold... Just masterfully mixed, this polish.


Polishes used:
A England - Lady of the Lake
Layla - Misty Blush
OPI - Nail Envy Matte (base coat)
INM - Out the Door (top coat)

Thanks for reading, as always! I hope to cook up some really neat stuff for you this next week or two.


J.

Sunday, 17 March 2013

St. Patrick's Day Nail Art: Nyan Pot-O'-Gold!

I had ZERO inspiration for St. Paddy's Day nail art until I was lying half-awake in bed this morning. And of all things to find inspiring, an outdated meme is a weird one. I probably ate too much sunomono last night (noooo, not possible!).

May I present: Nyan Pot-O'-Gold.

I dunno guys, it seemed appropriate.

I started with a base of Passport Blue, which I coated with my 20-grade Spectraflair topcoat to give it some pizzazz (yeah, I used 'pizzazz', deal with it). I then used white acrylic paint to draw the 'shadow' of the rainbow and the pot of gold. The blacks/greys are also acrylic paint, as are the little star details. The gold is nail polish, as are all the colours of the rainbow.

I tried to make the rainbow segments shorter at the end to denote them 'fading away' (kind of), but it didn't work.


On my thumb, I kept it simple with two (amazingly easy, gorgeous) coats of Liquid Leprechaun (HOW PERFECT?!). It was smoothed out with one coat of Poshé pretty well-- I'm noticing just the tiniest bit of texture now, about an hour later, so it's probably a 2-coater, which is excellent considering how much glitter it packs.


And I leave you with this purposefully blurry double-shot to show you the sparkly goodness of the Spectraflair topcoat and Liquid Leprechaun:


Polishes used (rainbow colours are in italics):
American Apparel - Passport Blue
Indigo Bananas - Spectraflair topcoat (20-grade)
Quo by Orly - Filthy Rich
Nails Inc. - St. James
Essie - Action
Revlon Top Speed - Electric
American Apparel - Crescent Heights
GOSH - Blue Balloon
Zoya - Mira
Pretty Serious - Liquid Leprechaun
OPI - Nail Envy Matte (base coat)
Poshé (top coat)
Black & white acrylic paint

Set in Lacquer has a contest going for St. Patrick's Day nail art, so I'm thinking I will submit this there. I can't expect it'd win (good grief, it's a riff on Nyan Cat, let's be serious), but it can't hurt to try to branch out and meet new people!


J.
 
SITE DESIGN BY DESIGNER BLOGS